# Sleep/hibernate/display/disk on AC powercfg /change /standby-timeout-ac 0 # Sleep timeout AC = Never powercfg /change /hibernate-timeout-ac 0 # Hibernate timeout AC = Never powercfg /change /monitor-timeout-ac 30 # Display timeout AC = 30 minutes powercfg /change /disk-timeout-ac 0 # Disk timeout AC = Never
# Disable hibernation feature + Fast Startup powercfg -h off
# Get current active scheme GUID $schemeGuid = (powercfg /getactivescheme) -replace '.*GUID:\s+([0-9a-fA-F-]+).*','$1'
# Set PCIe Link State Power Management = Off (AC + DC) $subPci = '501a4d13-42af-4429-9fd1-a8218c268e20' $setLspm = 'ee12f906-d277-404b-b6da-e5fa1a576df5'
conf t
ntp server <NTP_SERVER_IP> [prefer] use-vrf <VRF_NAME>
ntp peer <ip-address> use-vrf <vrf-name>
ntp source-interface <vlan-name>
ntp logging
Where the "ntp server" creates a client relationship to an upstream NTP server. The "ntp peer" creates a symmentric active peer relationship with each peer acting as a server and client.
And here is an example:
ntp server 10.162.100.20 prefer use-vrf default
ntp server 10.162.100.21 use-vrf default
ntp source-interface Vlan26
ntp logging
The issue faced on a Nexus is that the "source-interface" must be defined as the switch needs to know which interface to use to reach the NTP peer.
Verify by doing:
show ntp peers
show ntp peer-status
show run ntp
show clock
Admittedly, it is a bit confusing to use "show ntp peer-status" as a way to get info on ntp servers. But running the command will show an asterisk (*) next to the server being actively used.
If iscsi Nics are stealing traffic from the other nics, be certain that iscsi nics have:
Static IP and subnet mask only.
No default gateway.
Uncheck “Register this connection’s addresses in DNS.”
Leave only Internet Protocol Version 4 (TCP/IPv4) enabled. Disable everything else as they are not needed (Client for Microsoft Networks, File and Printer Sharing, etc.); this leave the iscsi nics as storage‑only.
There is a gap between Security Team, Sysadmin Team, Database Admin Team & Developer Team.
For whatever reason, dba's and dev's can be a bit obtuse in their practices and setup.
In addition, computer languages like Java, Python, VS Code, etc are just directories with files and can be moved to a custom location or in multiple locations and/or installed along side of another package as a dependency.
This leaves their systems in complete disarray with outdated versions and vulnerabilities with possible various locations.
Microsoft Defender for Cloud does a good job at listing vulnerabilities.
Below are the vulnerabilities I've come across recently with dba's and dev's and Microsoft Defender for Cloud.
By default, VS Code is installed as a USER SETUP under c:\Users\{Username}\AppData\Local\Programs\Microsoft VS Code It should update itself automatically but when VS Code is running as Administrator, updates are disabled.
Or to update and work of the account, VS Code the package is in the MS winget repo. By default, it performs a USER-INSTALL but changing the scope will install as a SYSTEM-INSTALL. This will fix for the account so when they run the shortcut should go the SYSTEM-INSTALL but will leave the existing install at the USER-INSTALL location of c:\Users\{Username}\AppData\Local\Programs\Microsoft VS Code winget install microsoft.visualstudiocode --scope machine
To update the USER-INSTALL, you can download the ZIP and extract/unzip to c:\Users\{Username}\AppData\Local\Programs\Microsoft VS Code: cd c:\windows\SystemTemp\ wget https://code.visualstudio.com/sha/download?build=stable"&"os=win32-x64-archive -outfile VSCode-win32-x64-1.105.1.zip Expand-Archive -force .\VSCode-win32-x64-1.105.1.zip "C:\Users\{Username}\AppData\Local\Programs\Microsoft VS Code"
The product team of mingw should update their product and release an update. But even on MS product teams, that can be delayed for months. If that does not happen, you should be able to manually replace the openssl files as long as the MajorVersionNumber is the same (v3.x.x->v3.x.x will probably work while v1.x.x->v3.x.x will probably not work).
The OpenSSL project does not provide binaries or an installable package (exe, msi, etc). That is left to other companies. The project has a list on their wiki here: https://github.com/openssl/openssl/wiki/Binaries
I find that most will use the ShiningLight which can be installed like this (light for most and dev for extended advanced capabilities): winget install ShiningLight.OpenSSL.Light winget install ShiningLight.OpenSSL.Dev
This will install into C:\Program Files\OpenSSL-Win64
You can see some details with the following: openssl version -a
The files (libcrypto-3-x64.dll & libssl-3-x64.dll) can be copied to where needed: cp C:\Program Files\OpenSSL-Win64\libcrypto-3-x64.dll c:\foo\externals\git\mingw64\bin\ cp C:\Program Files\OpenSSL-Win64\libssl-3-x64.dll c:\foo\externals\git\mingw64\bin\
NODE.JS
For some reason, winget isn't upgrading node.js. We can force it: winget upgrade node.js --force
As of this writing, you cannot simply rename an Azure VM. The creation of an Azure VMis separate from the data and the OS. The Azure VM just references the various items needed for the Azure VM to run. As such, you can delete a Azure VM, keep the disk, create a new Azure VMvm and attach the existing disk for an exact clone of the system.
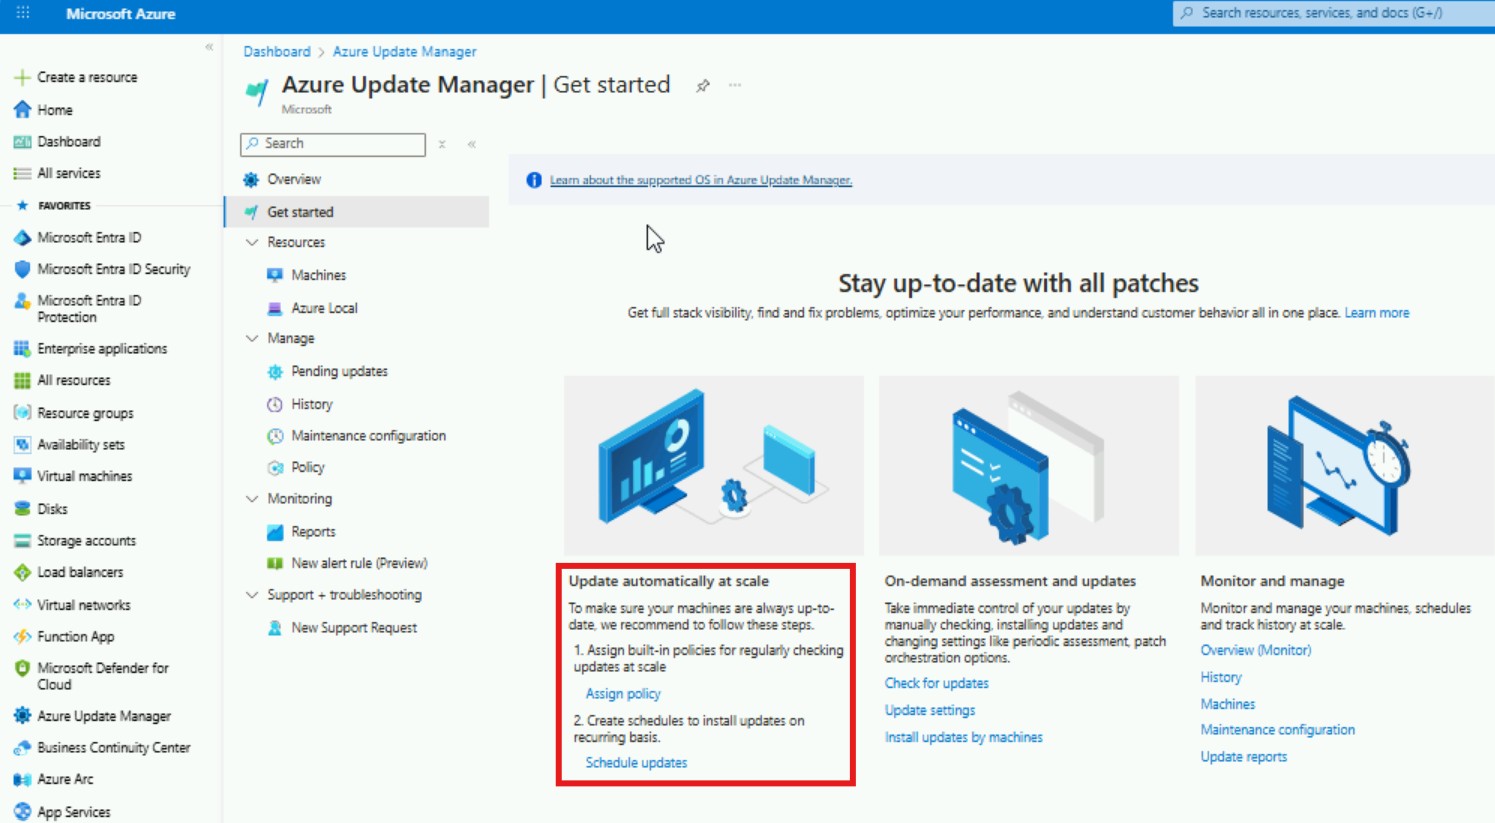
Start with the assessment at around 12:49 & add policies to enforce the assessment for VM's in Azure, assessment for VM's in Arc and Schedule Updates.
Azure Update Manager > Get Started.
Assign Policy.
Select "Machines Should be Configured to Periodically Check for Missing System Updates."
Select "Configure Periodic Checking For Missing System Updates on Azure Arc-Enabled Servers."
Select "Schedule Recurring Updates Using Azure Update Manager."
Enable Remediation.
Schedule Updates (18:30). With dynamic-categories, tags and time-offsets as needed. (max 1000 for dynamic groups and max 3000 resources for schedule).
QA systems.
UAT systems.
PROD systems.
margin/buffer/overflow/troubleshoot.
You can do assessment and update-on-demand but orchastration is the way to go.
Large teams are going to want to pay attention to the Phased rollout of patching where internal communication between teams are needed: 27:43 - Phased rollout of patching
Changing Patch Orchestration
For systems that are set to "Azure Managed - Safe Deployment", you can change this group to "Customer Managed Schedules".
To do so, on the right-hand side:
Group By "Patch Orchestration".
Select everything in "Azure Managed - Safe Deployment".
select UPDATE SETTINGS (at the top).
select PERIODIC ASSESSMENT to ENABLE.
select HOTPATCH to DISABLE.
select PATCH ORCHESTRATION to "Customer Managed Schedules"
Microsoft Update (updates more than just the OS)
What's interesting about Azure Update Manager is that it is a reactionary reporting tool rather than a dictation/command-and-conquer tool, which I would expected it to be. In other words, AUM runs remote commands on the system to change the settings. Maybe it works, maybe it does not work. This is in contrast to SCCM or Group Policy that dictates to the system what should or should not be.
You can also login to the individual VM and change the setting and AUM reports accordingly after inventory refresh.
Bitlocker was on. Luckily, there was a local admin account active to access Windows Recovery Environment needed for both on-disk Windows RE and on-usb Windows RE and the files could be seen.
The following was without boot success.
Automatic Repair Startup Repair Uninstall Recent Feature Update (none could be found) Uninstall Recent Quality Update (worked but still no boot) Boot to Command Line: chkdsk /f /r c: sfc /scannow dism /image:c:\ /cleanup-image /checkhealth dism /image:c:\ /cleanup-image /scanhealth dism /image:c:\ /cleanup-image /restorehealth
GPT (UEFI/GPT) Find EFI Partition; not the Windows partition. diskpart list disk sel disk number-here list vol sel vol number-here assign letter=z: exit
cd /d z:\efi\Microsoft\Boot| bootrec /fixboot ren BCD BCD.bak bcdboot c:\Windows /s z: /f All
more c:\windows\system32\logs\srt\srttrail.txt shows a result as bad hard disk.
Noticed that when trying to boot, there was no hard drive disk activity light. This indicates that the system isn't even trying to access the internal SSD. This indicates that the bootloader is either corrupt or pointing to the wrong location.
BIOS boot options view shows nothing add new boot option name Windows-newboot select local ssd device browse EFI\Microsoft\Boot\bootmgfw.efi save reboot F12 Select Windows-newboot
Disk activity & boots fine.
Something causes the bootloader corruption. Either a bios update causes bootloader corruption or a Windows Update causes a new partition with new EFI but the bootloader is still trying to use the old location. My guess is on the latter.
While you typically interact with the internet and web sites with a Web-Browser (Edge, Chrome, Firefox, Safari, etc), you can also interact with the internet via shell (command-line, powershell, bash, etc.
WGET and CURL are included by default in recent versions of Windows 10 and Windows 11. Curl was included as a default component in Windows starting with Insider build 17063 of Windows 10, which was released in December 2017.
This means you can directly use CURL commands in the Command Prompt (CMD) or PowerShell (PS), similar to how you would in Linux.
Don't forget that PowerShell offers the Invoke-WebRequest (aka WGET), which provides similar functionality to CURL for making HTTP/HTTPS requests and interacting with web services. While WGET has a different syntax than CURL, it can be useful.
At this point in time and in our experience, PowerShell uses CURL as an alias for Invoke-WebRequest.
WGET
You can test WGET getting a web site with: wget -v https://website-name-here wget -v https://google.com
The return will show "STATUS 200" & "OK" when it reaches the site properly:
The return will timeout and error out when it does not reach the site:
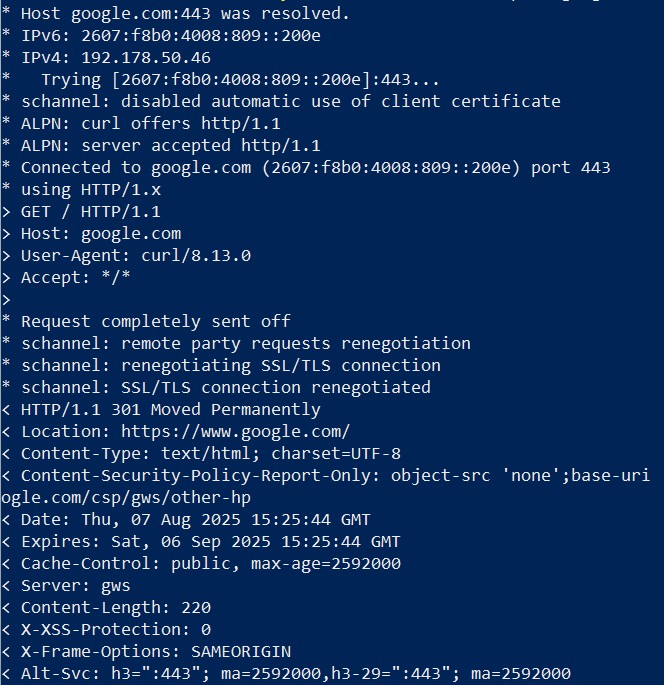
CURL
You can test CURL getting a web site with: c:\windows\system32\curl -v https://website-name-here c:\windows\system32\curl -v https://google.com
The return will show "STATUS 200" & "OK" when it reaches the site properly:
The return will timeout and show "Failed to Connect" out when it does not reach the site:
get-entrausergroup -userid This email address is being protected from spambots. You need JavaScript enabled to view it.
get-entrauserrole -userid This email address is being protected from spambots. You need JavaScript enabled to view it. |select displayname
get-entrauserregistereddevice -userid This email address is being protected from spambots. You need JavaScript enabled to view it. get-entrauserregistereddevice -userid This email address is being protected from spambots. You need JavaScript enabled to view it. |select -exp additionalproperties #Use the following to see the property members: #get-entrauserregistereddevice -userid This email address is being protected from spambots. You need JavaScript enabled to view it. |select -exp additionalproperties |gm (get-entrauserregistereddevice -userid This email address is being protected from spambots. You need JavaScript enabled to view it. |select -exp additionalproperties).displayname (get-entrauserregistereddevice -userid This email address is being protected from spambots. You need JavaScript enabled to view it.).additionalproperties.displayname
Exchange Feature Flighting | Exchange Site Reliability
Microsoft Exchange Updates
Microsoft Exchange Updates are the following:
SU = Security Update released monthly. These include security updates and changes required to protect the servers.
CU = Cumulative Update released biannually, meaning 2 times every year. These include new features as well as all security updates. Sometimes referred to as Feature Updates. The release schedule used to be every March and September with the naming convention being "YearMonth" in YYMM format. So, for example, 1903 stands for March 2019 and 1909 stands for September 2019. But release schedules are hard to keep and often slip past the release timeframe. "It's ready when it's ready!" As a result, the release timeframes were moved from 1-month time-window to 6-months time-window with the naming convention being "YearHalf" in YYH1 format. So, for example, 24H1 stands for the first half of the year of 2024 and 24H2 stands for the second half of 2024. Note that even though this update category contains features, everyone wanted to stay away from using the FU abbreviation.
HU = Hotfix Update released as needed. These include "oh crap" fixes for a specific issue/problem/scenario.
Feature Flighting - Microsoft Exchange Update for Subscription Edition (SE)
Feature Flighting is an update process by which the feature is included in the CU but it is disabled by default. Then the servers check every hour to an online endpoint (officeclient.microsoft.com) controlled by Microsoft product team. This Microsoft team can enable/disable features on a global stage when they feel ready.
This is done by RINGS or LEVELS or RING-LEVELS or RING-NUMBERS or STAGES-OF-RELEASE or RELEASE-STAGE. It depends on who you talk to.
Stages
The RING numbers are 0, 1, 2 and they correspond to different stages of release. The proper term is Software Development Life Cycle (SDLC).
Ring -2 (as in T minus 2) / Alpha / Canary / Insider Preview: presumably, this ring stage is hidden from public view.
Ring -1 (as in T minus 1) / Beta / Preview: presumably, this ring stage is only available to select trusted teams.
Ring 0 (as in Ring Zero) / Release Candidate (RC): this ring stage is available to everyone so the feature can be tested in their on-prem environment.
Ring 1 (as in Ring One) / Production: released globally. This is the default setting.
Ring 2 (as in Ring Two) / Admin must enable feature manually.
Prereq
To see if your servers can reach the Microsoft Exchange Flight Endpoint, use: test-netconnection officeclient.microsoft.com -p 443
To see if your servers can reach the Microsoft Cert Trust List, use: test-netconnection ctldl.windowsupdate.com -p 80
This is port 443 but it is UDP traffic. This is the Google QUIC protocol. Blocking QUIC will retransmit over TCP and let the application be identified properly.
To double-check on the system, the following will output a list of all listening sockets, all open connections, and the ports/protocols/addresses they're bound to: netstat -ano
======================================
Internal team findings show that traffic should just be TCP traffic on port 443 & port 80.
The external customer has a cybersecurity team that is monitoring traffic from their systems to our SAAS. It is possible the methodology used from customer networks is that they used a firewall to capture the traffic from the desktop/laptop being used to access our SAAS. As a result, the firewall will pick up all communication on the desktop/laptop; not just the traffic to/from our SAAS.
Applications on the system including background-applications, browsers and browser-extensions will reach out on various port to various locations.
Some applications, browser-traffic and browser-extension-traffic that have been attributed our SAAS include, but not limited to, the following:
Google Google-owned urls may show because the client systems are using chrome. Chrome will automatically try to fill in the username/password. So in this scenario, the content-autofill will show along with other Google-owned urls: content-autofill.googleapis.com encrypted-tbn0.gstatic.com lh5.googleusercontent.com update.googleapis.com etc,
Firefox In the same manner, if they use Firefox, the firewall will produce results to Mozilla-owned urls: mozilla.com mozilla.net etc.
Onedrive If the client systems have OneDrive installed and it is trying to reach out to a personal onedrive/sharepoint storage, the Microsoft-owned urls may show: storage.live.com {tenant-name}.sharepoint.com etc.
Google QUIC (UDP443) If the client systems have Google-doc extension, the Google-owned may show UDP traffic on port 443. This is the Google QUIC protocol. Blocking QUIC will retransmit over TCP and let the application be identified properly. This is recommended by PaloAlto: KB: kA10g000000ClarCAC (https://knowledgebase.paloaltonetworks.com/KCSArticleDetail?id=kA10g000000ClarCAC)
Microsoft (TCP7680) Microsoft WUDO-delivery-optimization. The client systems are set to receive/send updates to either other systems on the LAN or on the WAN. Swarm protocol (receive Windows Updates from other system on LAN/WAN), but could be any swarm protocol. (deep-dive: https://www.sygnia.co/blog/chapter-2-black-box-research/)
Microsoft (TCP3544) Microsoft XBOX app-x packets are XBOX-LIVE & XBOX-CONSOLE-COMPANION.
Advanced System Scan: DISM /Online /Cleanup-Image /ScanHealth
If corruption, fix with restore health: DISM /Online /Cleanup-Image /RestoreHealth (or if you need the source from a Windows 11 ISO download: DISM /Online /Cleanup-Image /RestoreHealth Source:E:\\Sources\\install.wim)
Reboot
The above steps repair the image stored on the system but it does not repair the actively-working OS install. To do so: sfc /scannow
Reboot
Check to see the component store: Dism /Online /Cleanup-Image /AnalyzeComponentStore
Winget 0x8a15005e : The server certificate did not match any of the expected values
When you try to install a package from winget source (https://cdn.winget.microsoft.com/cache) with something like: winget install NartacSoftwareInc.IISCryptoCLI
you get the following error: ======================== Failed when searching source: msstore An unexpected error occurred while executing the command: 0x8a15005e : The server certificate did not match any of the expected values. ========================
To fix, type: winget settings --enable BypassCertificatePinningForMicrosoftStore
Now try the install again and it should go through: winget install NartacSoftwareInc.IISCryptoCLI
Let say that there is an old Windows IIS web server that has some type of code that sends SMTP email. How can you search through all the files without opening them all?
Yes; there is a GREP package that can be installed.
But if you wanted native Powershell or if you're in a locked down environment where the security team would throw a fit then:
# Define the request body # User Admin: fe930be7-5e62-47db-91af-98c3a49a38b1 # Global Admin: 62e90394-69f5-4237-9190-012177145e10 # To rollback, leave the values blank for both source and allowedRoles (ie "".) $body = @{ source = "cloud" allowedRoles = @("fe930be7-5e62-47db-91af-98c3a49a38b1", "62e90394-69f5-4237-9190-012177145e10") }
# Convert to JSON $BodyJson = $body |ConvertTo-Json
# Send the PATCH request with the correct headers $Settings = Invoke-MgGraphRequest -Uri $Uri -Method PATCH -Body $BodyJson -Headers @{ "Content-Type" = "application/json" }
/var/log/vmware/applmgmt/restore.log /var/log/vmware/applmgmt/reconciliation.log Failed to start all the vCenter services. Error: Failed to start services in profile ALL. RC=1, stderr=Failed to start sca, vapi-endpoint, vpxd-svcs services /var/log/vmware/vapi/endpoint/endpoint.log Server certificate chain is not trusted and thumbprint verification is not configured vi /etc/hosts added: 192.168.21.152 localhost wq
Error message: vCenter Server has been restored. However, additional steps must be completed before it is available for use. Clicke the link below to continue.
Presumably this happens because the certificates that were in the backup are now expired with the current date.
Need to regenerate all the certificates. ssh to VCSA. /usr/lib/vmware-vmca/bin/certificate-manager 8 -Fill in as appropriate. -Wait about 15 minutes. -Success
That's it!!! Start WINSCP from another system and set it to: PROTOCOL: SFTP HOSTNAME: 192.168.1.x PORT: 22 USERNAME: This email address is being protected from spambots. You need JavaScript enabled to view it.
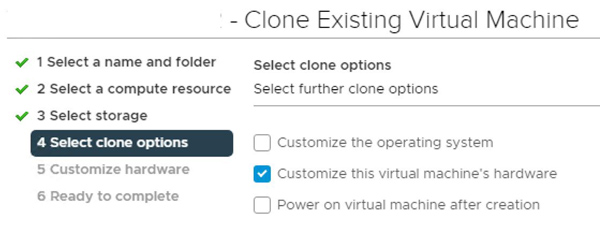
VMWARE Clone VM OS Hard Disk (Exclude Additional Hard Disks)
Let's say you have a VM that is storing data in which the OS is on a hard disk and each year of data is on a separate hard disk. It would look like this:
C: OS
D: 2017
E: 2018
F: 2019
G: 2020
H: 2021
I: 2022
L: 2023
M: 2024
Now, let's say that you want to clone the OS system because it has specially configured software but you don't want to clone the data.
-in VCENTER
-right-click > CLONE-TO-VIRTUAL-MACHINE
-select a NAME, COMPUTE-RESOURCE and STORAGE.
-select CUSTOMIZE THIS VIRTUAL MACHINE'S HARDWARE.
-click the X to remove the ADDITIONAL HARD DISK.
-uncheck DELETE FILES FROM DATASTORE.
-uncheck the NETWORK ADAPTER (so that you can change the IP address before connecting to the network).
When the clone is done, only the OS drive cloned.
VM CLONE BUG
When using the CUSTOMIZE THIS VIRTUAL MACHINE'S HARDWARE option, the newly created VM still references the original VMDK. This is a bug.
Note that the VMDK is cloned correctly, it just isn't selected in the configuration.
To resolve, change the configuration to select the newly created VMDK:
click ACTIONS > EDIT SETTINGS
click the X to remove the HARD DISK (do not delete from datastore).
click ADD NEW DEVICE > EXISTING HARD DISK.
select the NEW-VM-FOLDER-NAME.
select the NEW-VMDK file.
When you boot the VM, it may complain but it sorts itself out after a few minutes. Just:
change the IP address.
change the systemname.
reboot.
upon reboot, connect to the network.
Manual Clone
You can also make a new directory, copy some of the VM source files to the new directory, change the file names and some of the settings in the config file to make a clone.
-create new directory with the new VM name (ie NEW-VM-NAME-HERE).
-shutdown the source VM.
-copy the following to the new directory:
VMX file.
VMXF file.
VMDK file for each hard disk. Note that if there is a snap shot, it needs the
nvram file.
hlog file.
-rename the newly created files to match the NEW-VM-NAME-HERE.
-for the VMDK files do not modify anything after the "_". So OLD-VM-NAME-HERE_4.vmdk to NEW-VM-NAME-HERE_4.vmdk)
-download the VMX file to your local system..
-edit the VMX file with a text editor.
-edit the following to reference NEW-VM-NAME-HERE.
DISPLAYNAME
VMDK (rename the reference to each hard disk to NEW-VM-NAME-HERE.VMDK (ie scsi0:0.fileName = "NEW-VM-NAME-HERE_4.vmdk"))
VNRAM
HLOG
VSWP
-save the file.
-upload to the new directory.
-checkmark the VMX file.
-click REGISTER VM.
Edit the VM SETTINGS.
-click ACTIONS > EDIT SETTINGS
-click the X to remove any additional HARD DISK not needed (do not delete from datastore).
When you boot the VM, it will ask is you COPIED or MOVED:
-select COPIED if the system needs a new MAC ADDRESS.
-select MOVED if the system needs the existing MAC ADDRESS.
Azure P2P Server Showing In App Registrations. Seems suspect/fishy.
Yes; it is legitimate. P2P Server is automatically added after a Windows device is successfully joined to Entra ID (EID). It enables RDP authentication for EID Joined devices.
You have a .csv file of accounts from somewhere and you need to check if the accounts exist in AD, AAD/EID. But the list doesn't have USERPRINCIPALNAME, it only has the email address.
Now with the PFX, this can be uploaded and binded to the services. Following the KB here:
Expired Certificate on Exchange 2013
You can use the DigiCertUtil.exe to do some help with: -export certificate. -test key. -view certificate. -repair certificate. -create csr. -import certificate. -check signature. -check the chain. -check the install.
Notes: If using pem format and want to keep the bundle (crt & key): openssl pkcs12 -in file.pfx -out file.withkey.pem openssl rsa -in file.withkey.pem -out file.key cat file.nokey.pem file.key > file.combo.pem https://www.digicert.com/support/tools/certificate-utility-for-windows
SYMPTOMS -the vSphere Client has a red bar complaining about not being able to connect to SSO. -vmware HTTP Status 500 – Internal Server Error -no healthy upstream
REASON The certificates have expired on the system.
RESOLUTION Need to regenerate all the certificates.
Either user VCSA: -networking > edit -next > next -password -finish -let VCSA finish
or
/usr/lib/vmware-vmca/bin/certificate-manager 8 -Fill in as appropriate. -Wait about 15 minutes. -Success
If this results in "no healthy upstream", then usually there is a hostname mismatch or an ip address mismatch. Seems like Dell services just used the ip address for everything.
Here are the settings used: ================================================== Option[1 to 8]: 8 Do you wish to generate all certificates using configuration file : Option[Y/N] ? : Y
Please provide valid SSO and VC privileged user credential to perform certificate operations. Enter username [This email address is being protected from spambots. You need JavaScript enabled to view it.]: Enter password:
Please configure certool.cfg with proper values before proceeding to next step.
Press Enter key to skip optional parameters or use Default value.
Enter proper value for 'Country' [Default value : US] :
Enter proper value for 'Name' [Default value : CA] :
Enter proper value for 'Organization' [Default value : VMware] :
Enter proper value for 'OrgUnit' [optional] : VMware Engineering
Enter proper value for 'State' [Default value : California] :
Enter proper value for 'Locality' [Default value : Palo Alto] :
Enter proper value for 'IPAddress' (Provide comma separated values for multiple IP addresses) [optional] : 192.168.26.20
Enter proper value for 'Email' [Default value : This email address is being protected from spambots. You need JavaScript enabled to view it.] : This email address is being protected from spambots. You need JavaScript enabled to view it.
Enter proper value for 'Hostname' (Provide comma separated values for multiple Hostname entries) [Enter valid Fully Qualified Domain Name(FQDN), For Example : example.domain.com] : 192.168.26.20
Enter proper value for VMCA 'Name' :192.168.26.20 Continue operation : Option[Y/N] ? : Y ==================================================
The docs are a little wonky on this. The video is much better. It shows that if you are running on self-sign certs, they can be exchanged directly in the migration process.
========================================= #Gather data from winre [string]$nfo = reagentc /info if($nfo -match ".Windows RE status:.Enabled.*"){ #Verify if WINRE is enabled, if so proceed. $nfo -match ".Windows RE location.harddisk(\d+)" | Out-Null #Locate the disk number it is on. $disk = $Matches[1] $nfo -match ".Windows RE location.partition(\d+)" | Out-Null #Locate the partition it is on. $partition = $Matches[1] New-Object -TypeName psobject -Property $([ordered]@{Enabled='True';Disk=$disk;Partition=$partition;Resizable=(((Get-Disk -Number $disk | Get-Partition).PartitionNumber | Measure-Object -Maximum).Maximum -eq $partition);CurrentSize=(string.Size / 1MB) +'MB');A1_Key=[System.GUID]::NewGuid()}) }else{ New-Object -TypeName psobject -Property $([ordered]@{Enabled='False';Disk='N/A';Partition='N/A';Resizable='N/A';CurrentSize='N/A';A1_Key=[System.GUID]::NewGuid()}) }
========================================= #Gather data on if this can be done. [string]$nfo = reagentc /info if($nfo -match ".Windows RE status:.Enabled.*"){ #Verify if WINRE is enabled, if so proceed. $nfo -match ".Windows RE location.harddisk(\d+)" | Out-Null #Locate the disk number it is on. $disk = $Matches[1] $nfo -match ".Windows RE location.partition(\d+)" | Out-Null #Locate the partition it is on. $partition = $Matches[1] $disk_type = $(Get-Disk | Select-Object Number, PartitionStyle | ?{$_.Number -eq 0}).PartitionStyle #Determine disk partition style.
#Start building the script to pass to diskpart. $Diskpart_Script = "sel disk $disk`n" #Target disk with recovery partition. $Diskpart_Script += "sel partition $($partition - 1)`n" #Target partition left adjacent to recovery partition. $Diskpart_Script += "shrink desired=250 minimum=250`n" #Shrink by 250m. $Diskpart_Script += "sel partition $partition`n" #Target recovery partition. $Diskpart_Script += "delete partition override`n" #Remove it. if ($disk_type -eq 'GPT'){ #Recreate partition based on partiton table layout. $Diskpart_Script += "create partition primary id=de94bba4-06d1-4d40-a16a-bfd50179d6ac`n" $Diskpart_Script += "gpt attributes=0x8000000000000001`n" }else{ $Diskpart_Script += "create partition primary id=27`n" } $Diskpart_Script += "format fs=ntfs label="Windows RE tools" quick`n" #Format the newly created partition. $Diskpart_Script | Out-File .\DiskScript.txt -Encoding ascii #Write the script.
Remember that SMB1 can be both SERVER and CLIENT on the same system.
But disabling SMB1 is not the same as REQUIRING SIGNING. That's what this note is saying.
You can inspect on a per-system basis via regedit: reg query HKLM\SYSTEM\CurrentControlSet\Services\LanmanServer\Parameters reg query HKLM\SYSTEM\CurrentControlSet\Services\LanmanWorkstation\Parameters
You will see the following: EnablePlainTextPassword REG_DWORD 0x0 EnableSecuritySignature REG_DWORD 0x1 RequireSecuritySignature REG_DWORD 0x0
To require signing, either set via regedit: echo y | reg add HKLM\SYSTEM\CurrentControlSet\Services\LanmanWorkstation\Parameters /t REG_DWORD /v RequireSecuritySignature /d 1 echo y | reg add HKLM\SYSTEM\CurrentControlSet\Services\LanmanServer\Parameters /t REG_DWORD /v RequireSecuritySignature /d 1
Or set via Group Policy: Computer Configuration\Policies\Windows Settings\Security Settings\Local Policies\Security Options Find "Microsoft network client: Digitally sign communications (always)" Set to ENABLE Find "Microsoft network server: Digitally sign communications (always)" Set to ENABLE
EntraID Connect (formerly known as Azure AD Connect) has a new version v2.3.6
All v1 installs have stopped working. Oddly, the logs don't show "error" messages but rather "informational" message.
If you want to see the error messages, just run:
Get-ADSyncScheduler
In case you need a first hand experience, you can just download the msi and install in-place. Obviously, snapshot before hand in the event something goes wrong.
To reassure you, this is an environment with more than 10K objects, uses a separate sql database on a separate server and a standalone Managed Service Account (sMSA); instead of a group managed service account (gMSA).
You will need a Global Admin account on the Entra ID during the process.
But all the sync rules and setting remained intact.
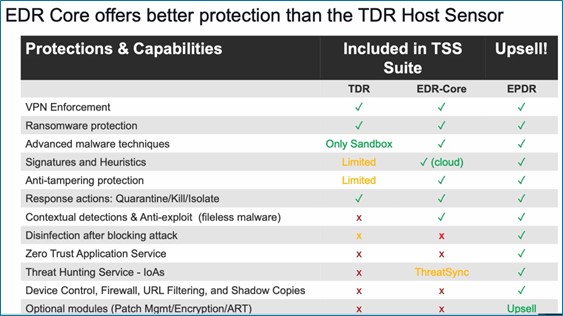
WatchGuard Threat Detection (TDR) automatically senses cryptolocker and shutdown the node.
It is part of the WatchGuard Total Security Suite (rather than just the basic-security). This is one reason why WatchGuard Total Security Suite is priced higher.
Inside the cloud, you can download a msi that will automatically connect back your Watchguard Cloud portal: -MONITOR -> ENDPOINTS -> COMPUTERS -> ADD-COMPUTERS (on the right-hand side).
INSTALL EDR
To get going:
-download the MSI.
-placed in your local repository (ie \\fs-officename-01\installs\apps\watchguard\edr)
-add the package to your DEPLOYMENT tool(s). (no additional parameters are needed).
-deploy to your systems.
ADD FIREWALL POLICY EXCEPTIONS
You should already have a firewall policy that allows traffic from any-trusted-internal to external-partner-servers called OUTGOING-HTTP-ALLOWED & OUTGOING-HTTPS-ALLOWED. To add to the list:
-create an ALIAS for EXTERNAL-WATCHGUARD-SERVERS.
-add *.pandasecurity.com | *.pandasoftware.com | *.watchguard.com -edit the OUTGOING-HTTP-ALLOWED and add EXTERNAL-WATCHGUARD-SERVERS.
-edit the OUTGOING-HTTPS-ALLOWED and add EXTERNAL-WATCHGUARD-SERVERS.
The Watchguard Cloud Portal will start to fill up with your systems where you can perform additional tasks and run reports.
Once connected, you can enable ThreatSync XDR. While EDR runs on the endpoint (laptop, desktop, etc), ThreatSync XDR extends this capability and corrolates the information together in a single cloud dashboard. You can enable ThreatSync XDR:
EDR-Core & EDR The version that comes with the Firebox Total Security is EDR-Core. This can be upgraded to EDR. This includes additional features like Threat-Hunting, Zero-Trust and Advanced Reporting Tools.
XDR As above, XDR extends the EDR to the cloud for corrolation and reporting purposes.
EPP EDR works along side of Antivirus products. If you want, WatchGuard offers their own. WatchGuard EPP is traditional antivirus; basically Panda Antivirus since WatchGuard bought Panda Antivirus in March 2020.
EPDR & EPDR-Advanced When you have EPP and EDR, it is called EDPR. The reasoning behind this is that it is a single product performing 2 roles (EPP and EDR). This can be further upgrade to EDPR Advanced. This includes Advanced Threat Hunting and rules to search for indicators of compromise (IOC's).
MDR And finally, Managed Detection and Response (MDR). This is a professional 24 hour operation center that helps you sleep. If you have the budget to staff and run a 24-hour opertion, that would be an option as well.
EXAMPLE: ls DellSmbios:Performance Set-Item -Path DellSmbios:Performance\Speedstep disabled -verbose Set-Item -Path DellSmbios:Performance\LogicProc enabled -verbose ls dellsmbios:PowerManagement\wakeonlan ls dellsmbios:PowerManagement\wakeonlan |select -exp possiblevalues set-item -path dellsmbios:PowerManagement\wakeonlan LanOnly -verbose ls DellSmbios:PowerManagement\DeepSleepCtrl ls DellSmbios:PowerManagement\DeepSleepCtrl |select -exp possiblevalues set-item DellSmbios:PowerManagement\DeepSleepCtrl Disabled -verbose ls DellSmbios:PowerManagement\BlockSleep ls DellSmbios:PowerManagement\BlockSleep |select -exp possiblevalues set-item DellSmbios:PowerManagement\BlockSleep enabled -verbose
Or to set RAID to AHCI: ls dellsmbios:SystemConfiguration\EmbSataRaid ls dellsmbios:SystemConfiguration\EmbSataRaid |select -exp possiblevalues set-item -path dellsmbios:SystemConfiguration\EmbSataRaid Ahci -verbose Reboot to Safe-Mode Reboot to normal-mode
All devices (server-nics, iscsi-hbas, switches and san-nics) need to support and be configured for jumbo frames.
Windows Physical Server MTU Settings
For each network adapter or iSCSI HBA on the Windows Physical Server:
via command line: netsh interface ipv4 show subinterfaces netsh interface ipv4 set subinterfaces [indexnumber] mtu=xyzz store=persistent
via gui: open network & internet settings. change adapter options. right-click adapter name. properties. configure. advanced tab. jumbo-packet. set to 9014.
VMware ESXi Host MTU Settings (vmk nic)
In vSphere, click: HOST-NAME > CONFIGURE > VIRTUAL-SWITCHES find the VMK. elipses. view/edit the MTU settings.
Dell Compellent SC Series Storage MTU Settings
Dell Compellent | SC 280184 | CT-SCv3000 | SC-Series are all the same. Commonly referred to as Compellent, the line of storage is being phased out in favor of simplifying Dell offerings.
The jumbo frames need to be set in the fault-domains. This can be done via the web gui but most Dell EMC ProSupport techs I talk to like to use the Dell Storage Manager Client (DSMC).
Setting this will automatically set the MTU on the physical ports.
Also note that the Compellent has data-tier's; fast, medium,slow. The idea is to put SSD's in the fast, 15K's/10K's in the medium and 7K's in the slow.
It will automatically try to get you to set to Automatic tiering.
But if you only have all the same drives, put the volume on Tier 1 as it gives better performance.
Cisco Nexus 3172T | Nexus 3000 Series
This is a tough one.
In large corporate networks, different teams handle different areas. For the sake of discussion, let's say there is a virtual/VMware team and a networking team.
From what I can tell, VMware SysAdmins have trouble explaining to network admins what is needed. I find this is mostly a lack of understanding of networking by the VMware sysadmins. I don't criticize them; it is confusing. Especially when converged systems have an abstract layer.
On the other side, good networking teams are hard to find. Anyone can type the commands if it is in a work instruction but actually knowing and understanding the concepts and diagnosing the situation-at-hand is farther and fewer between than you might imagine.
A good networking team will want to have a proper datacenter setup with top-of-rack (TOR) and aggregation switches using Cisco Nexus switches. These are setup in a VPC fail-over. Note that this is not a stack. Like a stack, they do communicate to each other. But unlike a stack, they are independent. So if one fails, the other takes over. The communication is simply for knowing what the other is doing. Not for traffic.
As a result, the VMware Sysadmins don't understand this VPC concept and gravatate towards stacking with Cisco Catalyst switches. Plug 2 x48 port switches together in the back and they show as a 96 port single switch. Simply plug everything in and boom dot done. Of course on the con side of the coin, this is a single point of failure. If a switch fails, there is an outage.
The trade-off here is that they don't have to involve the network team as much. It gives VMware Sysadmins more control and they like that.
We try to do things properly around here. We are using a Cisco Nexus 3172T - Nexus 3000 series.
While the higher-end untis of Nexus 7000-series and the Nexus 9000-series have per-port MTU settings, the Cisco Nexus 3172T does not have per port MTU settings. The MTU settings need to be set on the QOS policy.
Finally, after all these years. Setting up an OpenManage Enterprise.
There is the following: iDRAC: out of band management for cold boot. OpenManage Server Administrator (OMSA): single server management. OpenManage Essentials: older. OpenManage Enterprise (OMENT): one-to-many management.
change to AUTOMATIC and select a time for daily sync.
click CREATE-BASELINE
select the catalog; ie DELL-SUPPORT
type a baseline name; ie DELL-SUPPORT-BASELINE
click NEXT
bullet SELECT-GROUPS
select ALL-DEVICES for everything.
click FINISH
OMENT will automatically check the compliance. If not, you can start it manually without harm.
Once finished, you view the report, it will show all devices (compute, storage, chassis, etc) and show everything that is out of date with the version that is installed and the version that is available.
Simply checkmark the item(s) and click MAKE-COMPLIANT.
You can run the job now or schedule for later time such as overnight. It will let you know if an reboot is required or not. I choose an update that does not require a reboot and simply bullet UPDATE-NOW and click UPDATE as a test.
This puts the job in the queue and runs it automatically. You can view the job if want and it will show the status of each update and the entire process. After a few minutes, it shows the item updated successfully.
As a next test, I checkmark the entire compute and click MAKE-COMPLIANT. I select UPDATE-NOW and bullet "Stage for Next Server Reboot." It took a bit of time but it downloaded all the packages to the LifeCycle Controller and staged them for update durning next reboot.
With the system logged in, I rebooted the system. With the virtual console, I could see the packages be applied as the system booted up.
The update included the bios, network firmware, perc, ssd firmware and a few other firmware items.
1-How to update the disks in the VRTX. https://www.dell.com/support/kbdoc/en-us/000134181/dell-poweredge-how-to-update-disks-on-a-vrtx#:~:text=%20Article%20Content%20%201%20Connect%20the%20Chassis,the%20Keyboard%20section%20to%20filter%20the...%20See%20More.
3-How to upgrade the switch firmware. https://www.dell.com/support/kbdoc/en-us/000193156/how-to-upgrade-the-firmware-on-a-dell-vrtx-network-1gbe-r2401-switch
4-How to update the CMC of a Dell PowerEdge VRTX https://www.dell.com/support/kbdoc/en-us/000144612/how-to-update-the-cmc-of-a-dell-poweredge-vrtx#:~:text=1%20Log%20into%20the%20CMC%20IP%20with%20the,updated%2C%20starting%20from%20the%20active%20to%20the%20standby
========================================== -find service tag number. -had TOSHIBA - KPM5XVUG480G. -wanted to update the disk firmware, cmc, idrac. -all of these can be done without an production interruption. -use support site to download the following: --disk firmware --cmc bin file --idrac -login to the cmc. -click STORAGE (on the left-hand side). -click UPDATE (at the top). -click CHOOSE-FILE. -select SAS-Drive_Firmware_4P9DW_WN64_B026_A00.EXE (yes, the entire EXE file; no do not extract; yes, the x64 if possible). -click UPDATE. -it will go through disk by disk (all x16 disks) and update the firmware. -again, this will not interrupt any system in production.
-click CHASSIS-OVERVIEW. -click UPDATE. -find CMC Firmware (towards the top). -find cmc-active & cmc-standby. -checkmark the cmc-standby. -click APPLY-CMC-UPDATE. -click CHOOSE-FILE. -select "vrtx_cmc.bin" (be sure the version is correct as it is not included in the file name; mine was 3.41.200). -click BEGIN-FIRMWARE-UPDATE. -it will go through and update the firmware. -again, this will not interrupt any system in production. -be patient. -it will eventually show as updated with the correct version number (start continuous ping to cmc ip address; it will stop responding and then start responding again). -start the same process for the cmc-active (you do not need to manually switch over; this will happen automatically). -the same process will complete and both will have the same version.
-login to the idrac. -click MAINTENANCE. -click SYSTEM-UPDATE. -click CHOOSE-FILE. -select iDRAC-with-Lifecycle-Controller_Firmware_T9J9H_WN64_6.10.30.20_A00.EXE (yes, the entire EXE file; no do not extract; yes, the x64 if possible). -click UPLOAD. -checkmark the new idrac firmware. -click INSTALL. -the idrac will update and reboot the bmc without interfering with the live production system.
-login to the idrac. -click MAINTENANCE. -click SYSTEM-UPDATE. -click CHOOSE-FILE. -select the firmware for the nic-X550; Network_Firmware_F52F0_WN64_21.5.9_A02.EXE (yes, the entire EXE file; no do not extract; yes, the x64 if possible). -click UPLOAD. -checkmark the new network firmware. -click INSTALL UPON NEXT REBOOT.
-go to https://customerconnect.vmware.com/ -download the esxi custom image for Dell systems. -the Dell custom iso has the drivers slipstreamed for use with the vrtx. Without this, you risk the system not being able to recognize some of the hardware. -use the idrac to bring up the virtual console. -click VIRTUAL-MEDIA. -click CONNECT-VIRTUAL-MEDIA. -find MAP CD/DVD. -click CHOOSE-FILE. -select the VMware-VMvisor-Installer-7.0.0.update03-20842708.x86_64-Dell_Customized-A10.iso -click MAP-DEVICE. -click CLOSE. -click BOOT. -click VIRTUAL CD/DVD/ISO. -click YES. -this will tell it to boot from the ISO as a one-time-process. -go to the VCENTER. -move all vms to other hosts. -put in maintenance mode. -right-click > power > reboot. -watch virual console. -be patient. -it will reboot and begin to update network firmware. -once idrac is updated, it will boot the ESXI iso.
-you will see the Welcome to the VMWARE ESXI installation. -click ENTER. -press F11 to accept EULA. -select disk to install. Usually, this is the LOCAL drive. -press ENTER to continue. -it will find the existing installation. -it will automatically select UPGRADE ESXI, PRESERVE VMFS DATASTORE. -press ENTER to continue. -press F11 to confirm & upgrade. -the upgrade will continue to 100%.
-click ENTER (to reboot; it will automatically reboot to the local drive and not use the ISO). -click VIRTUAL-MEDIA. -click DISCONNECT-VIRTUAL-MEDIA. -click YES > CLOSE. -the reboot will load the new version of ESXI. -it may take longer than usual; this is normal. -once up, go to VCENTER and take out of maintenance-mode. -you are finished. The entire cluster updated firmware, drivers and ESXI os without any production downtime.
After initial setup, find way to perform WSUS maintenance. The following seven items are the ways I've tried to perform WSUS maintenance. I started with more than 38K updates in WSUS.
2-Wsus-Maintenance Install-Script -Name Wsus-Maintenance Wsus-Maintenance (to see the readme) Wsus-Maintenance -Run
3-DeploymentBunny get script: https://deploymentbunny.com/2016/02/03/working-in-the-datacenter-keeping-wsus-happy-using-powershell/ https://github.com/DeploymentBunny/Files/tree/master/Tools/Invoke-WSUSMaint
I do have personal powershell script with regedit gets/sets. But it seems like Sysadmins want a GUI and I'm finding out are afraid of the shell/powershell.
The DevOps Azure team finally came up with a powershell script that will check the server and will create a customized script that changes the server to the recommended values.
The goto for a GUI is IISCrypto.exe. It is nice to have a GUI for reference as it has the Protocols, Ciphers, Hashes and Key-Exchanges.
For reference, here is the security Protocol through history:
PCT 1.0 (1995)
SSL 2.0 (1995)
SSL 3.0 (1996)
TLS 1.0 (1999)
TLS 1.1 (2006)
TLS 1.2 (2008)
TLS 1.3 (2018)
Then there is the fact that the protocols have different settings depending on if:
the server OS is acting as a server or as a client.
Multiple Server 2019 Not Updating Cumulative Update. It would just keep trying to download and install.
TLDR;
-Reset-WUComponents. -remove VMWARE TOOLS -uninstall all hotfixes to get back to realse-to-manufacturing (rtm) -reboot -DISM /Online /Cleanup-Image /RestoreHealth -sfc /scannow -reboot -get-windowsupdate -microsoftupdate -verbose -install-windowsupdate -mcirosoftupdate -verbose -install one-by-one; leaving the CUMULATIVE-UPDATE last. -removed failed drivers from C:\Windows\INF\setupapi.dev.log -install CUMULATIVE-UPDATE
Story
Tried newest SSU Tried Reset-WUComponents. Tried manual reset. Tried DISM /Online /Cleanup-Image /RestoreHealth Tried sfc /scannow Tried sfcfix Tried dotnet repair. Tried setting sc query appreadiness to automatic. Tried Troubleshooter Windows Update. Tried VM Console (no RDP).
The installation would go through but the reboot would fail with the error message: "We couldn’t complete the updates. Undoing changes."
Manual intervention was required.
First, let us stop the automatic update so we can inspect what is happening without the system continuously updating: net stop cryptsvc net stop bits net stop wuauserv
Next, let us see what patch/hot-fix is failing: get-wuhistory You will see the failed patches/hotfixes/KBArticleIDs.
get-windowsupdate -microsoftupdate -verbose This will show a list of available. The updates were: KB4589208 Update for Windows Server 2019 KB5021085 2022-12 Cumulative Update for DotNet KB2267602 Microsoft Defender Antivirus KB5022286 2023-01 Cumulative Update January
install-windowsupdate -microsoftupdate -verbose Install one at a time; select yes to the first and no to the rest. Leaving the last as the Cumulative Update
Let's make sure the services are set to start automatically: sc query cryptsvc sc query bits sc query wuauserv sc query trustedinstaller
sc config wuauserv start=auto sc config bits start=auto sc config cryptsvc start=auto sc config trustedinstaller start=auto (trustedinstaller/"windows module installer" will reset itself to DEMAND_START/"manual" after the Cumulative Update)
cleanmgr reboot
Try to install the Cumulative Update. We know it will fail but it generate logs on reboot. install-windowsupdate -microsoftupdate -verbose
Next, we can look at the following logs: get-windowsupdatelog (this is the overall update log) c:\windows\logs\cbs.log (this is the details of the update which kicks it off to the reboot log) c:\windows\logs\cbspersist log (this is the reboot log details when the "Trusted Installer" takes over)
Let's grep/search/findstr for the error: cat .\CbsPersist_20230125113018.log |findstr /i hresult
Shows the following: DriverUpdateUninstallUpdates failed [HRESULT = 0x80070003
Let's grep/search/finstr for the error: cat C:\Windows\INF\setupapi.dev.log -tail 500 |findstr !
Shows the following: ! sto: Unable to open configuration key for driver package 'oem8.inf'. Error = 0x00000002 ! sto: Unable to open configuration key for driver package 'wpdfs.inf'. Error = 0x00000002 ! sto: Unable to invalidate all dependent driver configurations. Error = 0x00000002 ! idb: Could not locate driver package 'C:\Windows\System32\DriverStore\FileRepository\ntprint.inf_amd64_83aa9aebf5dffc96\ntprint.inf' for publishing. Error = 0x00000003 ! cpy: Unable to publish 'ntprint.inf_amd64_83aa9aebf5dffc96\ntprint.inf' to 'ntprint.inf' via hardlink. Error = 0x00000003 !!! cpy: Failed to publish 'ntprint.inf_amd64_83aa9aebf5dffc96\ntprint.inf' to 'ntprint.inf'. Error = 0x00000003 !!! idb: Failed to unpublish 'C:\Windows\System32\DriverStore\FileRepository\ntprint.inf_x86_a87eceb9bd76580c\ntprint.inf'. Error = 0x00000003 !!! sto: Failed to unpublish driver package. Error = 0x00000003 !!! sto: Failed to unpublish all driver updates. Error = 0x00000003 !!! idb: Cannot unregister published driver package 'ntprint.inf_amd64_92093dc83a6de3db'. Error = 0x00000032 !!! idb: Failed to unregister driver package 'C:\Windows\System32\DriverStore\FileRepository\ntprint.inf_amd64_92093dc83a6de3db\ntprint.inf'. Error = 0x00000032 !!! sto: Failed to delete driver package from Driver Store. Error = 0x00000032 !!! sto: Failed to unstage all driver updates. Error = 0x00000032 ! sto: Driver package already imported as 'oem14.inf' (C:\Windows\System32\DriverStore\FileRepository\ntprint.inf_amd64_92093dc83a6de3db\ntprint.inf). ! dvi: Access denied from Query and Remove ! dvi: Access denied from Query and Remove ! dvi: Access denied from Query and Remove ! dvi: Access denied from Query and Remove ! dvi: Access denied from Query and Remove !!! idb: Cannot unregister published driver package 'ntprint.inf_amd64_92093dc83a6de3db'. Error = 0x00000032 !!! idb: Failed to unregister driver package 'C:\Windows\System32\DriverStore\FileRepository\ntprint.inf_amd64_92093dc83a6de3db\ntprint.inf'. Error = 0x00000032 !!! sto: Failed to delete driver package from Driver Store. Error = 0x00000032 !!! sto: Failed to unstage all driver updates. Error = 0x00000032 ! sto: Driver package already imported as 'oem14.inf' (C:\Windows\System32\DriverStore\FileRepository\ntprint.inf_amd64_92093dc83a6de3db\ntprint.inf).
>>> [Delete Device - SWD\PRINTENUM\{D94CF386-60BA-424C-AAC6-92B3F6144E4D}] >>> Section start 2023/01/25 06:31:48.466 cmd: C:\Windows\System32\spoolsv.exe ! dvi: Access denied from Query and Remove <<< Section end 2023/01/25 06:31:48.466 <<< [Exit status: SUCCESS]
Looks like it is related to Printers/PrintNightmare.
=============================== Not sure if this section is needed
Open regedit.exe as Administrator Click HKEY_LOCAL_MACHINE Load Hive select "C:\Windows\System32\config\DRIVERS" Enter Key Name "TEMP" Go to "REGPATH\TEMP\DriverDatabase\DriverInfFiles\ntprint.inf" Take Ownership of this key. Grant Administrators Full Control in Permissions. Edit "Default" remove ntprint.inf_ntprint.inf_amd64_83aa9aebf5dffc96 and ntprint.inf_x86_a87eceb9bd76580c Edit "Active" enter the remaining key example for my system was "ntprint.inf_amd64_83aa9aebf5dffc96".
Take Ownership and also Delete the referenced package. HKEY_LOCAL_MACHINE\TEMP\DriverDatabase\DriverPackages\ntprint.inf_amd64_83aa9aebf5dffc96 HKEY_LOCAL_MACHINE\TEMP\DriverDatabase\DriverPackages\ntprint.inf_x86_10ccc41e998ac968
========
Go to "REGPATH\TEMP\DriverDatabase\DriverInfFiles\ntprint4.inf" Take Ownership of this key. Grant Administrators Full Control in Permissions. Edit "Default" remove all data Edit "Active" remove all data
Take Ownership and also Delete the referenced package. HKEY_LOCAL_MACHINE\TEMP\DriverDatabase\DriverPackages\ntprint.inf_amd64_83aa9aebf5dffc96
Error CSI 00000042 (F) HRESULT_FROM_WIN32(ERROR_SXS_ASSEMBLY_MISSING) #197922# from Windows::ServicingAPI::CCSITransaction::ICSITransaction_PinDeployment(Flags = 0, a = 6f29c89d491b36146c2ff9acd3327914, version 4.0.15713.815, arch amd64, nonSxS, pkt {l:8 b:31bf3856ad364e35}, cb = (null), s = (null), rid = 'Package_2_for_KB5013641~31bf3856ad364e35~amd64~~10.0.3946.2.5013641-38_neutral', rah = '9', manpath = (null), catpath = (null), ed = 0, disp = 0)[gle=0x80073701]
net stop spooler del %systemroot%\System32\spool\printers\* /Q HKLM\SYSTEM\CurrentControlSet\Control\Print\Environments net start spooler
Let's remove the KB:
wusa.exe /uninstall /KB:5013641 /quiet /norestart
Or try to go back to Release To Manufacturing (RTM) by removing all the hotfixes: (get-hotfix).hotfixid.replace("KB","") | % {& wusa.exe /uninstall /KB:$_ /quiet /norestart}
Sometimes the wusa does not work as well as the remove-windowspackage:
Or if you need to remove all the updates to get back to release to manufacturing (rtm): Get-WindowsPackage -Online ` |?{$_.ReleaseType -like "Update"} ` |Remove-WindowsPackage -Online
I find that for stubborn packages, using DISM is best.
Take a look at all the "Update" packages: Get-WindowsPackage -Online |?{$_.ReleaseType -like "Update"} | ` ForEach-Object {Get-WindowsPackage -Online -PackageName $_.PackageName} |select Description |ft -autosize
Or uninstall all patches/hotfixes to get back to Release To Manufacturing (RTM): Get-WindowsPackage -Online |?{$_.ReleaseType -like "Update"} |Remove-WindowsPackage -Online -NoRestart
Hotfix Uninstall
Get all packages from get-hotfix that classified as "Updates": get-hotfix |?{$_.description -eq "Update"}
if (get-hotfix -id KB5009543) { wusa /uninstall /kb:5009543 }
0xc1d0000b due to failure pre-committing: Out of memory
Could not stat LFB on volume VRTX_Datastore: Out of memory
Heap vmfs3 already at its maximum size
exceeded for caller Fil3_FileIOInt
Max no space retries (10) exceeded for caller Fil3_SetFileLength (status 'No space left on device')
There is no more space for virtual disk 'VMNAME-HERE.vmdk'. You might be able to continue this session by freeing disk space on the relevant volume, and clicking Retry. Click Cancel to terminate this session.
Here is what I did. Transfer some of the VM off the Host to another host.
-set the DNS interface to be IPv4 only; remove all other interfaces. -be sure the interface is set to DOMAIN/PRIVATE.
In short, check DNS and make sure the bindings are only on the IPv4 Interface. Remove the other IP Interfaces like the IPv6 and the "Remote NDIS Compatible Device." Again, YMMV as the IPv6 might be needed in the environment.
Also set the interface to DOMAIN/PRIVATE. For whatever reason, the Network Location Awareness service starts too early and set the location to PUBLIC. You can set to PRIVATE through: get-netconnectionprofile |set-netconnectionprofile -networklocation PRIVATE
As well as set the NLA service to be a dependency on the DNS and NTDS: sc config nlasvc depend=NSI/RpcSs/TcpIp/Dhcp/Eventlog/DNS/NTDS
In reality, the problem could be many items in the network configuration. But in this case, the vPC on the Cisco Nexus ToR switches wasn't create correctly and the NIC Team wasn't created correctly on the Windows Server. So when I created the NIC Team, it enabled DNS responses on all the new IP Addresses/Interfaces of that NIC Team as well as other adapters. So I set DNS to only respond on the IPv4 interface and disabled the others. I went so far as to remove IPv6 altogether with: Disable-NetAdapterBinding –InterfaceAlias “Ethernet Interface Name Here” –ComponentID ms_tcpip6
When DNS was set to only the IPv4 interface, it took a few minutes for everything to sort itself out but it finally settled down and hummed along nicely afterwards.
Windows Service Update Server (WSUS) will patch the Windows OS (Windows 10, Windows 11, etc).
PDQ will deploy/patch 3rd party software (Chrome, Firefox, SAP, Acrobat Reader, etc). And I'm all for agent controlled systems like Ivanti/LANDesk/MobileIron.
AlienVault SEIM/USMA will track changes in the network.
Rapid7 will test for vulnerabilities and adhere to a standard.
But all the scheduling for after-hours scanning/patching/updating/deploying doesn't mean anything if the system isn't turned on.
As a Dell "shop", we are familiar with some of the abilities that are available, such as Dell Command Update: dcu /scan
But Dell also has Dell Command PowerShell. This is a PowerShell module to control BIOS settings. Wait... what? Yup... awesome!
First, let's get the module which is convently stored in the PowerShell Gallery: [Net.ServicePointManager]::SecurityProtocol = [Net.SecurityProtocolType]::Tls12 Install-Module -Name DellBIOSProvider
In a datacenter spine-leaf model, 2 leaf switches are in the Top of Rack (ToR). Typically, the switches do not stack because they are not designed to stack. By design, each switch operates independently. This is for high availability. When both switches are working, there are 2 paths from the rack to the spine/core layer. In the event one switch goes down, one path remains. Having the switches stacked would result in a single path to the core. If the stack goes down, all paths to the spine goes down; not the desired result.
Lower in the rack, servers hum along with multiple NICs. This could be a single server or a modular server like a Dell VRTX or an Dell FX. Each host in the chassis will have to independently go to each ToR switch.
While the ToR switches are independent, they still need to communicate. This is done through a vPC connection. The vPC connection is broken into 2 separate links; a peer-link and a keep-alive link. The peer-link sends the data over a high-speed connection (40G) for synchronization. Because the link is vital, 2 ports on each switch (say 1/49 and 1/50) should be used and bonded together through a LAG/Team/PortChannel. LAG's show as Po1, Po2 and so on.
The other link, a keep-alive link, is a simple heartbeat link and can be a slower connection (1G) such as the management port; mgmt0. It just asks/responds to keep-alive queries. If it fails, it automatically takes action.
Just as the switchports have a LAG, the NICs on the server should have a LAG. Windows Server calls this a TEAM and Linux calls this a BOND (Intel calls this Advanced Network Services - ANS). I have other articles on creating a TEAM/BOND, so I won't do it here.
The goal is to have 2 NICs in a Team with one NIC going to the top switch and one NIC going to the bottom switch. Horizontally, the Nexus switches talk to each other to share information over the Peer-Link and check their other's status through the keep-alive link. Altogether, graphically, it looks like this:
The TEAM has different modes; STATIC (hard assignment to Po1) or DYNAMIC/LACP (automatically negotiate and assigned).
For LACP to work, configuration must be done on both side; on the OS and on the Switch.
On the OS, enable NIC Teaming, LACP and Dynamic, like so:
For Dell PowerSwitches, the LAG is set with simple numbers; 1 for Po1. Just find the port that is needed (hint: use the ADDRESS-TABLES tab to lookup the MAC) and assign the LAG number. After the LAG number is assigned, click the LACP box to toggle and show an "L". Click APPLY.
Afterwards, find the next switchport and complete the same steps.
Where some get confused is that they create the LAG with all the ports/members and then they try to change to LACP. This will error with a message, "Cannot add a dynamic member to a LAG with static members." You have to remove all the ports/members from the LAG and add them one at a time.
If it is a smaller site/campus, then the CORE layer becomes redundant. There is no reason to send the traffic from the DISTRIBUTION layer to the CORE layer over 10G/25G/40G/100G just to have it, in turn, uplink that traffic to the firewall. Instead, just remove the CORE layer and let the firewall connection(s) become another port on DISTIBUTION switch.
You can try to shutdown or power-off the VM, but this never worked for me: vim-cmd vmsvc/power.shutdown VMID vim-cmd vmsvc/power.off VMID
================================= You can try to kill the VM, but this never worked for me:
esxcli vm process list esxcli vm process kill -t=soft -w=WorldID esxcli vm process kill -t=hard -w=WorldID esxcli vm process kill -t=force -w=WorldID
Soft is the most graceful Hard performs an immediate shutdown Force should be used as a last resort
============================================ There might be a lock on one of the files:
cd ~ cd /vmfs/volumes/DATASTORE-NAME-HERE/VM-NAME-HERE/ (ie: cd /vmfs/volumes/MDL_64TB_0/DC-FL-02)
Or if you want the actual volume identifier: find -iname VM-NAME-HERE cd /vmfs/volumes/5f241452-2001c64a-3959-1c721d715751/VM-NAME-HERE
lsof |grep -i "VM-NAME-HERE" ls |while read x; do vmfsfilelockinfo -p $x |grep -i "is locked"; done
If there is a lock from a MAC address, try to return the VM to the host that has the MAC address and consolidate the snapshots. Check to see if the lock is removed.
In some cases, I can log into the vm and gracefully shutdown the guest OS and that removes the lock.
If 2 mac addresses show, find that hosts that are the culprit but note that HA can handle multiple mac addresses gracefully: esxcli network ip neighbor list
You can try to restart the following services, but this never worked for me: /etc/init.d/vpxa stop /etc/init.d/hostd stop /etc/init.d/vpxa start /etc/init.d/hostd start
Find any deltas: ls -la /dev/deltadisks (There should be no vmdk's here).
Shows mappings from device to uuid: esxcli storage vmfs extent list
cd /var/log less vmkernel.log |grep -i "VM-NAME-HERE"
cd /var/run/log less vmkernel.log |grep -i "VM-NAME-HERE"
============================================ Finally just hard reboot the host via iDRAC.
Eventually found an error message: There is no more space for virtual disk 'VM-NAME-HERE1_1-000003.vmdk'. You might be able to continue this session by freeing disk space on the relevant volume, and clicking _Retry. Click Cancel to terminate this session.
What is strange is that there is 40TB free on the Datastore-0. Migrated vm data files to independent datastore; Datastore-4 with 123TB free. Removed oldest snapshot.
In some situations, Veeam Backup software will create a snapshot prior to backing a VM. However, it fails. The snapshot will not show in the snapshot-manager.
Try to create a new snapshot and then choose the delete all. This should consolidate the snapshot chain.
However, if it keeps failing the consolidation, you might find that there is a .lck on it (see the instructions above).
Rebooting the host should unlock it. If it does not, stop all services associated to the backup software on the VM and try again.
Veeam locks the file when it fails. So, once the file is no longer locked, it should create a snapshot and then delete all.
to resolve the space issue temporarily, purge the content from content-library-runtime.log.stdout:
# cd /storage/log/vmware/content-library/
# echo > content-library-runtime.log.stdout
replace the content in /etc/vmware-content-library/log4j.properties with the contents of the file attached to this KB:
# cd /etc/vmware-content-library/
# cp -R log4j.properties log4j.properties.old
# cat /dev/null > log4j.properties
# vi log4j.properties - insert data from file attached to this document
Verify the file ownership/permissions and change accordingly:
Did the TASK BAR in Outlook suddenly move the left-hand side?
This happens in Office365/Outlook365 as part of Microsoft's continuous updates and feature upgrades. This upgrade is intended to be permanent and cannot be turned off.
However, to put the Outlook Task Bar back in the proper place at the bottom:
Note that since this is a CURRENT-USER change, it happens as the current user; do not run AS-ADMIN or else you will be changing the ADMINISTRATOR account and not the account that is currently being used.
Run the following to check the certificates in vCenter:
for store in $(/usr/lib/vmware-vmafd/bin/vecs-cli store list | grep -v TRUSTED_ROOT_CRLS); do echo "[*] Store :" $store; /usr/lib/vmware-vmafd/bin/vecs-cli entry list --store $store --text | grep -ie "Alias" -ie "Not After";done;
Here is the result:
[*] Store : MACHINE_SSL_CERT Alias : __MACHINE_CERT Not After : Jul 30 04:55:53 2022 GMT [*] Store : TRUSTED_ROOTS Alias : 1de53225634a45f52840baf7b4a8e7dd6f8f1493 Not After : Jul 24 16:55:52 2030 GMT [*] Store : machine Alias : machine Not After : Jul 24 16:55:52 2030 GMT [*] Store : vsphere-webclient Alias : vsphere-webclient Not After : Jul 24 16:55:52 2030 GMT [*] Store : vpxd Alias : vpxd Not After : Jul 24 16:55:52 2030 GMT [*] Store : vpxd-extension Alias : vpxd-extension Not After : Jul 24 16:55:52 2030 GMT [*] Store : hvc Alias : hvc Not After : Jul 24 16:55:52 2030 GMT [*] Store : data-encipherment Alias : data-encipherment Not After : Jul 24 16:55:52 2030 GMT [*] Store : APPLMGMT_PASSWORD Alias : location_password_default [*] Store : SMS Alias : sms_self_signed Not After : Jul 29 17:00:11 2030 GMT [*] Store : wcp Alias : wcp Not After : Jul 24 16:55:52 2030 GMT
-shutdown vCenter in the ESXi interface. -take offline snapshot. -verify the snapshot is complete. -start the vCenter vm. -/usr/lib/vmware-vmca/bin/certificate-manager -press 3 -ran through defaults using the ip address as the hostname and vCENTER as VMCA name. -wait 15 minutes. -try vCenter web ui again.
VCSA vCenter Server with an embedded Platform Services Controller (PSC)
This has an internal ldap for single sign on (SSO); typically called VSPHERE.LOCAL. This can be changed to use SSO with another ldap or Windows Active Directory. Internally, this is called VMWare Directory or vmdir.
The VCSA system name/hostname should be in line with the domain; vcsa.company.tld
SSO: VSHPERE.LOCAL HOSTNAME.DOMAIN.LOCAL VCSA: v6.7.0.51000 ESXI: v6.7.0 USER: This email address is being protected from spambots. You need JavaScript enabled to view it.
===================================== -On VCSA, new gateway, from 192.168.21.1 to 192.168.21.120 -On VCSA, changed hostname from 192.168.21.152 to HOSTNAME.DOMAIN.LOCAL -Reboot -Error: Failed to connect to endpoint: [N7Vmacore4Http20NamedPipeServiceSpecE
===================================== Try to fix by: -ssh in as root -let us look at the logs
cd /var/log/vmware/vmdird/vmdird-syslog.log ls -la zcat vmdird-syslog.log.7.gz |grep 2022-07-15 |more
2022-07-15T02:20:10.930380+00:00 info vmdird t@140164554802944: VmDir State (2) 2022-07-15T02:20:10.930719+00:00 info vmdird t@140164554802944: Srv_RpcVmDirSetState: VmDir State (2) 2022-07-15T02:20:11.429906+00:00 info vmdird t@140164554802944: VmDir State (3) 2022-07-15T02:20:11.430213+00:00 info vmdird t@140164554802944: Srv_RpcVmDirSetState: VmDir State (3) 2022-07-15T02:34:26.608866+00:00 info vmdird t@140163900499712: Add Entry (cn=HOSTNAME.DOMAIN.local,cn=Servers,cn=Pittsburgh,cn=Sites,cn=Configuration,dc=vsphere,dc=LOCAL)(from 127.0.0.1)(by cn=Administrator,cn=Users,dc=vsphere,dc= LOCAL)(via Ext)(USN 19454,0) 2022-07-15T02:34:26.663220+00:00 info vmdird t@140163900499712: Add Entry (cn=HOSTNAME.DOMAIN.local,ou=Domain Controllers,dc=vsphere,dc=LOCAL)(from 127.0.0.1)(by cn=Administrator,cn=Users,dc=vsphere,dc=LOCAL)(via Ext)(USN 19455, 0) 2022-07-15T02:34:26.666660+00:00 info vmdird t@140163900499712: MOD 1,rep,member: (cn=192.168.21.152,ou=Domain Controllers,dc=vsphere,dc=LOCAL) 2022-07-15T02:34:26.666908+00:00 info vmdird t@140163900499712: MOD 2,rep,member: (cn=HOSTNAME.DOMAIN.local,ou=Domain Controllers,DC=vsphere,DC=LOCAL) 2022-07-15T02:34:26.723039+00:00 info vmdird t@140163900499712: Modify Entry (cn=DCAdmins,cn=Builtin,dc=vsphere,dc=LOCAL)(from 127.0.0.1)(by cn=Administrator,cn=Users,dc=vsphere,dc=LOCAL)(via Ext)(USN 19456,0) 2022-07-15T02:34:26.760656+00:00 info vmdird t@140163900499712: Add Entry (This email address is being protected from spambots. You need JavaScript enabled to view it.,cn=Managed Service Accounts,dc=vsphere,dc=LOCAL)(from 127.0.0.1)(by cn=Administrator,cn=Users,dc=vsphere,dc=t pxca)(via Ext)(USN 19457,0) 2022-07-15T02:34:26.800188+00:00 info vmdird t@140163900499712: Add Entry (This email address is being protected from spambots. You need JavaScript enabled to view it.,cn=Managed Service Accounts,dc=vsphere,dc=LOCAL)(from 127.0.0.1)(by cn=Administrator,cn=Users,dc=vsphere,dc=t pxca)(via Ext)(USN 19458,0) 2022-07-15T02:34:26.850848+00:00 info vmdird t@140163900499712: Add Entry (This email address is being protected from spambots. You need JavaScript enabled to view it.,cn=Managed Service Accounts,dc=vsphere,dc=LOCAL)(from 127.0.0.1)(by cn=Administrator,cn=Users,dc=vsphere,dc=t pxca)(via Ext)(USN 19459,0) 2022-07-15T02:34:26.894935+00:00 info vmdird t@140163900499712: MOD 1,rep,vmwLKUPPropertyValue: (HOSTNAME.DOMAIN.local) 2022-07-15T02:34:26.931662+00:00 info vmdird t@140163900499712: Modify Entry (cn=Property3,cn=06bd9be7-5a98-4435-9a40-8c11d7847b69,cn=ServiceRegistrations,cn=LookupService,cn=Pittsburgh, cn=Sites,cn=Configuration,dc=vsphere,dc=LOCAL)(fr om 127.0.0.1)(by cn=Administrator,cn=Users,dc=vsphere,dc=LOCAL)(via Ext)(USN 19460,0) 2022-07-15T02:34:26.935916+00:00 info vmdird t@140163900499712: MOD 1,rep,serverName: (cn=HOSTNAME.DOMAIN.local,cn=Servers,cn=Pittsburgh,cn=Sites,cn=Configuration,dc=vsphere,dc=LOCAL) 2022-07-15T02:34:26.950811+00:00 info vmdird t@140163900499712: Modify Entry (cn=DSE Root)(from 127.0.0.1)(by cn=Administrator,cn=Users,dc=vsphere,dc=LOCAL)(via Ext)(USN 19461,0) 2022-07-15T02:34:26.953615+00:00 info vmdird t@140163900499712: MOD 1,rep,vmwDCAccountDN: (cn=HOSTNAME.DOMAIN.local,ou=Domain Controllers,dc=vsphere,dc=LOCAL) 2022-07-15T02:34:26.956569+00:00 info vmdird t@140163900499712: Modify Entry (cn=DSE Root)(from 127.0.0.1)(by cn=Administrator,cn=Users,dc=vsphere,dc=LOCAL)(via Ext)(USN 19462,0) 2022-07-15T02:34:26.959271+00:00 info vmdird t@140163900499712: MOD 1,rep,vmwDCAccountUPN: (This email address is being protected from spambots. You need JavaScript enabled to view it.) 2022-07-15T02:34:26.962386+00:00 info vmdird t@140163900499712: Modify Entry (cn=DSE Root)(from 127.0.0.1)(by cn=Administrator,cn=Users,dc=vsphere,dc=LOCAL)(via Ext)(USN 19463,0) 2022-07-15T02:34:26.989844+00:00 info vmdird t@140163900499712: Add Entry (cn=Replication Agreements,cn=HOSTNAME.DOMAIN.local,cn=Servers,cn=Pittsburgh,cn=Sites,cn=Configuration,DC=vsphere,DC=LOCAL)(from 127.0.0.1)(by cn=Administrat or,cn=Users,dc=vsphere,dc=LOCAL)(via Ext)(USN 19464,0) 2022-07-15T02:34:29.046587+00:00 err vmdird t@140163900499712: VmDirSRPGetIdentityData (This email address is being protected from spambots. You need JavaScript enabled to view it.) failed, (9611) 2022-07-15T02:34:29.047219+00:00 err vmdird t@140163900499712: VmDirSRPGetIdentityData (This email address is being protected from spambots. You need JavaScript enabled to view it.) failed, (9611) 2022-07-15T02:34:29.047458+00:00 err vmdird t@140163900499712: SASLSessionStart: sasl error (-20)(SASL(-13): user not found: no secret in database) 2022-07-15T02:34:29.047654+00:00 err vmdird t@140163900499712: VmDirSendLdapResult: Request (Bind), Error (49), Message ((49)(SASL start failed.)), (0) socket (127.0.0.1) 2022-07-15T02:34:29.047838+00:00 err vmdird t@140163900499712: Bind Request Failed (127.0.0.1) error 49: Protocol version: 3, Bind DN: "", Method: SASL
-the error is: "user not found: no secret in database" -it is referring to the following account: (This email address is being protected from spambots. You need JavaScript enabled to view it.)
===================================== Let's see if the VMWare Directory/SSO/VSPHERE.LOCAL exists and is working.
Or we can test using the vdcadmintool: /usr/lib/vmware-vmdir/bin/vdcadmintool GetVmDirState failed: VmDirGetState() failed. error(382312694) test ldap Please enter LDAP server host: 192.168.21.152 Please enter LDAP server port: 389 Please enter LDAP server SSL port: 636 Please enter LDAP Bind DN: dc=vsphere,dc=LOCAL Please enter LDAP Bind UPN: This email address is being protected from spambots. You need JavaScript enabled to view it. Please enter LDAP Bind password:
Now we know and have verified that the VMWare Directory is indeed working.
============================================== Let's reset the password for the account found in the error from the logs: (This email address is being protected from spambots. You need JavaScript enabled to view it.)
/usr/lib/vmware-vmdir/bin/vdcadmintool
select 3
Enter the vCenter server: This email address is being protected from spambots. You need JavaScript enabled to view it.
It will generate a random password for that account, but you may need to run more than once if it puts invalid characters or blanks in the password.
Note: The tool does not filter out invalid characters from the generated password such as: & (ampersand) ; (semicolon) " (double quotation mark) ' (single quotation mark) ^ (circumflex) \ (backslash) % (percentage)
Copy that password because you have to past it in the registry.
pA$$&;^\#*2i)W}nqK!~.Jd8z
============================================== The system mimics Windows Registry and has a registry of its own. Windows has REGEDIT/REG QUERY but VCSA has LWREGSHELL. This can view/change the registry.
Run these commands to view the reg key: /opt/likewise/bin/lwregshell cd HKEY_THIS_MACHINE\services\vmdir\ list_values
Run these commands to update the password in the reg key: set_value dcAccountPassword "pA$$&;^\#*2i)W}nqK!~.Jd8z" quit
Then reboot the VCSA.
============================================== The vSphere Client has a red bar complaining about not being able to connect to SSO. We will need to regenerate all the certificates.
-ssh in as root /usr/lib/vmware-vmca/bin/certificate-manager 8 -Fill in as appropriate but be sure use the ip addresswhen it says "optional" so that it will put the ip address in the Subject Alternative Name (SAN) of the certificate. -Wait about 15 minutes. -You should be able to access vSphere login page.
============================================== Here are some interesting areas I found along the way:
Find PNID: During the initial configuration of the VMware vCenter Server, the system name (FQDN or IP address) is used as the PNID, Primary Network Identifier. /usr/lib/vmware-vmafd/bin/vmafd-cli get-pnid --server-name localhost HOSTNAME.DOMAIN.local
Change the hostname can be done either via: VAMI; or VMware Appliance Management Interface -click NETWORKING (on left-hand side). -find NETWORK SETTINGS (in the middle). -click EDIT (on the right-hand side). -run through the settings wizard.
or by ssh: /opt/vmware/share/vami/vami_config_net
The root password has a default lockout of 3 attempts. Then you gotta wait 5 minutes to reset. To view: pam_tally2 -u root
To reset manually: pam_tally2 -u root -r
To shutdown/restart all the services: service-control --all --stop service-control --all --start
https://www.nakivo.com/blog/503-service-unavailable-error-on-the-vsphere-web-client/ (Long article but see Password Issues) https://docs.vmware.com/en/VMware-Integrated-OpenStack/7.2/com.vmware.openstack.admin.doc/GUID-02577103-96E9-49B0-A2B1-4D6BE6B2E103.html https://kb.vmware.com/s/article/2147280 https://communities.vmware.com/t5/vCenter-Server-Discussions/The-Reset-all-Certificates-option-in-the-certificate-manager/td-p/2247608
ADFS allows outside services to use your local AD accounts. Sometimes this can be done through:
-local connectors (such as MobileIron and AzureAD). -Azure AD connections (such as GoToConnect). -LDAPS connections on port 636 (such as Mimecast). -ADFS connections (such as Dropbox, Cisco, Adobe, Zoom).
ADFS is certificate based. If the certificate is correct and sent to the outside service, they can then connect to the ADFS and use the accounts locally.
One problem becomes when the certificate is expiring and needs to be updated. The outside service needs to be made aware of the change. This will depend on the outside service.
The ADFS can have multiple certificates; primary and secondary. As the primary one is expiring/expired, the secondary one should be considered. Again, this depends on the outside service.
What we did was activate a secondary certificate with the updated information and valid dates.
Then we went through all the vendors individually over the next few weeks to make sure that they were aware we were updating the metadata of the ADFS. Some of them said "no problem, just update the metadata in your such-and-such account." Others would only consider the first certificate.
To see all the certificates the computer account personal store:
get-childitem -path cert:\LocalMachine\My
This will come back with the Thumbprint and Subject.
Or if you want to look at all the properties of a single certificate:
Note that if you get a message about "Permanent Package Cannot be Unistalled"; that usually indicates that you are trying to uninstall a capability that another capability is depending on. In other words, remove the other capability first, then you can remove the dependency.
To get optional features:
dism /online /get-features /format:table
get-windowsoptionalfeature
Administrator Privledges | Locked Down Environment
If you happen to be in a locked down environment where you do not have admin privledes on your system, it's fine as we can work around that.
Copy the following file from a system that has the RSAT tools installed to the locked down system: C:\Windows\Microsoft.NET\assembly\GAC_64\Microsoft.ActiveDirectory.Management\v4.0_10.0.0.0__31bf3856ad364e35\Microsoft.ActiveDirectory.Management.dll
Then on the locked-down system, import the module: Import-Module .\Microsoft.ActiveDirectory.Management.dll
Another contributing factor is SHARED-MAILBOXES as they count towards the OST/NST file size.
There is a manual setting: -OUTLOOK -click FILE > ACCOUNT-SETTINGS > ACCOUNT-SETTINGS -click CHANGE -click MORE-SETTINGS -click ADVANCED tab (at the top) -uncheck DOWNLOAD-SHARED-FOLDERS -click OK > NEXT > FINISHED
This can also be done by registry edit. Here is a one-liner:
%WINDIR%\SystemApps (For system apps; ie Edge, Cortana, etc)
%PROGRAMFILES%\WindowsApps (For personal apps; ie Pictures, Videos, Calculator, etc)
The Way Appx Packages Works
Modern Apps are "provisioned" on the system. This means they are available to every account on the system to be installed. When this happens, the appx is now on a "manifest-list" or provisioned-list. When a new account signs in for the first time, all the provisioned-appx packages are installed for that account.
Modern Apps are then installed per account.
Get Modern Apps
Here is how to get a list of all provisioned packages on a system:
If you want to remove all but keep a certain set of Modern Apps, following will work but the Appx packages will come back during OS verion upgrade (ie v2004 to v2009).
" " ","This computer is the property of COMPANY.","- information system usage may be monitored or recorded, and is subject to audit";" ","- unauthorized use of the information systems is prohibited";" ","- unauthorized use is subject to criminal and civil penalties";" ","- use of the information system affirms consent to monitoring and recording";" ","- the information system contains CUI with specific requirements imposed by the Department of Defense";" and","- use of the information system may be subject to other specified requirements associated with certain types of CUI such as Export Controlled information."," " " ","(cmmc ac.2.005 | nist 800-171 3.1.9)
Or type in the specific repo (rarely needed): https://support.mobileiron.com/mi/sentry/9.7.3/ https://support.mobileiron.com/mi/sentry/9.8.1/ https://support.mobileiron.com/mi/sentry/9.9.0/
-click CHECK-UPDATES -bullet the version. -click DOWNLOAD-NOW -wait 1 minute. -bullet the version. -click STAGE-FOR-INSTALL. -wait 1 minute. -bullet the version. -click REBOOT-TO-INSTALL. -wait 5 minutes.
Internal web site with domain.corp name. Site has certificate from custom root-CA and custom intermediate-CA.
How to trust for entire internal domain.
Get the Certificates
-open INTERNET-EXPLORER (as-admin). -go to site with custom security. -view certificate. -click DETAILS -click COPY-TO-FILE. -save type as BASE-64-ENCODED (not DER). -save as: sub.domain.tld.cer
-click CERTIFICATION-PATH -click the INTERMEDIATE certificate (the one in the middle). -click VIEW-CERTIFICATE. -click DETAILS. -click COPY-TO-FILE. -save type as BASE-64-ENCODED (not DER). -save as: intermediate-hostname-as-in-certificate.cer
-click CERTIFICATION-PATH -click the ROOT certificate (the one at the top). -click VIEW-CERTIFICATE. -click DETAILS. -click COPY-TO-FILE. -save type as BASE-64-ENCODED (not DER). -save as: root-hostname-as-in-certificate.cer
-start new GP -click COMPUTER > POLICIES > WINDOWS-SETTINGS > SECURITY-SETTINGS > PUBLIC-KEY-POLICIES -click TRUSTED-ROOT-CERTIFICATION-AUTHORITIES -click IMPORT -select root-hostname-as-in-certificate.cer
-expand to INTERMEDIATE-RTIFICATION-AUTHORITIES -click IMPORT -select intermediate-hostname-as-in-certificate.cer
Firefox to Trust
-open FIREFOX -in address bar, type: about:config -accept the warning message that appears. -type: security.enterprise_roots.enabled -toggle to TRUE (default is FALSE).
Test
To test, either visit the site or get OPENSSL for system and check manually: echo GET | openssl s_client -connect processes.domain.corp:443
Powershell v5: comes with Windows-10 and only works on Windows. Scripting language only. Powershell Core (aka v6): used for .NET development. Installable on all systems Windows, Mac, Linux. Powershell v7: separate install. Co-exist install with v5. One SHELL for both Windows and .Net.
MODULES
Modules are packages that contains PowerShell items, such as cmdlets, providers, functions, workflows, variables, and aliases. Modules are kept and found in repositories or repos. In the repos, they are listed out as Script, Binary, Manifest. get-module [get-psresource]
You will notice that there is one called PackageManagement v1.0.0.1. This is the default for Windows 10, Powershell v5.
PACKAGEPROVIDERS | POWERSHELLGET v1
Packageproviders allows Powershell to handle a variety of package management system (apt-get, yum, winget, etc). This is needed because there are different types of providers. To explain, let's look at the builtin providers which are found with: get-packageprovider
It will output: msi: Microsoft Installation msu: Microsoft Update powershellget: From online gallery/repository. programs: From Add/Remove Programs
Unlike YUM where all items are .rpm or APT-GET where all items are .deb, Powershell can handle multiple items as shown above (.msi, .msu, .nupkg); this is why there is a need for different packageproviders.
Take note that there is one called PowerShellGet v1.0.0.1. This is the default for Windows 10, Powershell v5.
To see other providers: find-packageprovider
Perhaps you want Powershell to handle .nupkg packages. In this case, you would have to install the NuGet PackageProvder.
To install other providers, use the following which will allow Powershell to handle .nupkg extensions: install-packageprovider nuget
[get-PSResourceProvider does not exist because PSResourceGet only supports NuGet repositories, so it can only handle .nupkg packages.]
REPOS | REPOSITORIES | GALLERIES | PACKAGESOURCE
Repositories (aka Repos, aka galleries) is a collection of packages of a certain kind.
PSGallery: self publish repo for PowerShell users. While this is a MS platform, it is not trusted automatically as there is no code review. NuGet: self publish repo for PowerShell and .Net users for .nupkg packages. While this is a MS platform, it is not trusted automatically as there is no code review. Chocolatey: chocolately is an independent provider free from large corporation regulation.
To install a packagesource, you will need to assign a useful name as well as know the location of the repo: (Note that this is the outdated location. This exercise will allow us to show how to register, unregister & set. Keep going): Register-PackageSource -Name NuGet.org -Location "http://www.nuget.org/api/v2" -ProviderName Nuget [Register-PSResourceRepository]
UPDATING THE DEFAULT PACAKGEMANAGEMENT, POWERSHELLGET v2
As pointed out above, both the module of PackageManagement and PowerShellGet are at v1.0.0.1. While this is the default in Powershell v5 in Windows 10, both are outdated. As a result, the problem with this default version is that it is limited and does not return the correct packages.
You can verify this by: Get-Module PowerShellGet, PackageManagement -ListAvailable
Let's update both the module of PackageManagement and PowerShellGet.
Use the following to update: Find-Module PowerShellGet, PackageManagement |Install-Module –Force
Next, we have to exit Powershell because it is being used. Once reloaded, Powershell will pickup the new module versions of PackageManagement and PowerShellGet.
To be sure no other updates are available, let's update the modules: Update-Module -Name Packagemanagement Update-Module -Name PowerShellGet
Now when we inspect the modules, we can see that both versions are available: Get-Module PowerShellGet, PackageManagement -ListAvailable
But only the newest version is loaded: Get-Module PowerShellGet, PackageManagement
Note that updating the module will also update the PackageProvder of NuGet to v3.0.0.1 (as of this writing): get-packageprovider
This is interesting because v3.0.0.1 is not published, only v2.8.5.208: Find-PackageProvider -Name NuGet
If we were to install this PackageProvider manually, it would downgrade it to v2.8.5.208: Find-PackageProvider -Name NuGet |Install-PackageProvider -Force (NOTE: If you happen to do this, just install the PackageManagement module again, like this: Find-Module -Name PackageManagement |Install-Module –Force)
For the next step of upgrading the NuGet repo, we can see it is using the v2 location: get-packagesource [get-PSResourceRepository]
But there is a newer version of Nuget for newer clients, so we need to update this to the v3 location. To do so, let's remove the v2 location; this is called unregister: unRegister-PackageSource NuGet [Unregister-PSResourceRepository NuGet]
Now, let's add the v3 location; this is called register: Register-PackageSource -Name Nuget.org -Location "https://api.nuget.org/v3/index.json" -ProviderName NuGet [Register-PSResourceRepository -Name Nuget.org -uri "https://api.nuget.org/v3/index.json"]
Note that we could have used the following to set the Nuget repo location, but we are going through the unregister/register exercise to become familiar with the process: set-packagesource -Name Nuget.org -Location "https://api.nuget.org/v3/index.json" [Set-PSResourceRepository -Name Nuget.org -uri "https://api.nuget.org/v3/index.json"]
Or we could install GitHub repo: Set-PSResourceRepository -name "MyGitHubFeed" -Uri "https://nuget.pkg.github.com/MyGitHubOrg/index.json"
A module adds ability to Powershell. For example, you cannot run Powershell WSUS commands on a Powershell that doesn't have the WSUS module installed. The same for PSWindowsUpdate. A script automates something in Powershell. You can craft a Powershell script but maybe someone has already done the work for you. A package is either a module for Powershell or code for .NET
To search for a powershell package, module or script in the repositories, the command is: find-package <name-here> find-module <name-here> find-script <name-here> [find-psresource <name-here>]
Rarely do you know the actual name, so use asterisks as wildcards, like this: find-package *foo* find-module *foo* find-script *foo* [find-psresource *foo*]
The beauty of this is that the find-command will search all the repos as once. It will return the package name, version, source-repo and summary.
This can lead to many results, so we can narrow down the search to a specific repo: find-package *xaml* -providername NuGet
As another example, let's say you are looking for tools to help with ADFS Relying Party Trusts. So, you might try any of the following: find-package *adfs* find-module *adfs* find-script *adfs* [find-psresource *adfs*]
Also let's search another way: find-package *party* find-module *party* find-script *party* [find-psresource *party*]
You can see the results for find-package includes: .NET, modules. But not scripts. You can see the results for find-module includes: modules. But not .NET, scripts. You can see the results for find-script includes: scripts. But not .NET, modules. You can see the results for find-psresource includes .NET, modules and scripts.
INSTALLATION OF POWERSHELL MODULE | INSTALLATION OF POWERSHELL SCRIPT
To install a module: Install-Module PSWindowsUpdate [Install-PSResource PSWindowsUpdate]
To install a script: Install-Script Copy-RelyingPartyTrust [Install-PSResource Copy-RelyingPartyTrust]
The install commands will give a warning note because as stated above, while this is a MS platform, it is not trusted automatically as there is no code review.
Microsoft.PowerShell.PSResourceGet is the new package management solution for PowerShell. With this module, you no longer need to use PowerShellGet and PackageManagement. However, it can be installed side-by-side with the existing PowerShellGet module. I noted all the PowerShellGet-v3 commands in brackets above [].
Install-Module Microsoft.PowerShell.PSResourceGet
This is a new module that was released in October 2023. To see the details: get-installedmodule Microsoft.PowerShell.PSResourceGet |fl
There is a list of commands that I added with brackets: get-command -module Microsoft.PowerShell.PSResourceGet
This module is unified in the sense that is finds/gets/installs/uninstalls both modules & scripts with a single command rather than find-module/find-script | get-module/get-script | install-module/install-script. This is shown in the table above.
Note that it does not recognize currently installed modules/scripts via PowerShellGet or PackageManagement eventhrough they may be present.
INSTALLATION OF POWERSHELL 7
There are a few ways to install PowerShell v7:
1-Winget: winget install PowerShell
2-PDQ: PowerShell is available in the PDQ Library/Repo. Simply download the PowerShell Package and deploy to as many systems as needed.
3-PowerShell: PowerShell-v5 can be used to install Powershell-v7 with the following one-liner: Invoke-Expression "& { $(Invoke-RestMethod https://aka.ms/install-powershell.ps1) } -UseMSI"
Once installed, PowerShell-v5 and PowerShell-v7 will co-exist and run at the same time.
INSPECT ENVIRONMENT
To inspect some of PowerShell items, run the following:
$env:psmodulepath -split(';')
To see the current version: $PSVersionTable
To list the modules in the current session: get-module [get-psresource]
To get the modules that are installed on the system through PowerShellGet from the PSGallery repo: get-installedmodule get-installedscript [get-psresource]
To get the modules that are installed on the system but not yet imported into the current session. Note that Get-Module looks for available modules in the path specified by the $env:PSModulePath environment variable as listed above: get-module -listavailable
Some modules are built-in modules and automatically installed with Powershell.
You will see in the list is PowerShellGet. The PowerShellGet module is the module used to discovering, installing, updating and publishing other PowerShell modules. To get the commands in a module: Get-Command -Module Get-Command -Module PackageManagement Get-Command -Module PowerShellGet Get-Command -Module Microsoft.PowerShell.Core [get-command -module Microsoft.PowerShell.PSResourceGet]
To find what command belongs to a module: get-command <command-here>
For example, see the difference in the following: get-command get-packagesource get-command get-psrepository get-command Get-PSScriptFileInfo
Putting those together, if you are working with a command, we can find all the related commands: get-command -module (get-command command-here).source ie: get-command -module (get-command get-adSyncScheduler).source
To get help with the commands: Get-Help <command-here> man <command-here>
And to import a module into the session: Import-Module [Import-PSGetRepository]
To get the repos that are available on the system: get-packagesource get-psrepository get-psresourcerepository
The command says that the conversion should take place but keep the disk as a BASIC disk rather than a DYNAMIC disk. This is the number part of the command.
How to get the messages in Exchange that come from @gmail.com:
[PS] C:\>Get-MessageTrackingLog -Start "09/01/2021" -Recipient This email address is being protected from spambots. You need JavaScript enabled to view it. -Resultsize Unlimited |?{[string]$_.sender -like "*@gmail.com*"} |Select eventid,source,messagesubject,originalclientip
Windows is finally getting a Package-Manager like YUM or APT-GET along with a repository. The Package-Manager is called WINGET (apparently after APT-GET; someone at MS must be a Ubuntu/Debian fan).
Install Winget Windows 11 | Install Winget Windows 10
It is awkward getting WINGET which is kinda ironic. Reportedly, it will be in WINDOWS-UPDATES automatically at some point.
For Windows 11 results vary. Winget is usually automatically in Windows 11; sometimes not. Probably factory config.
Use the winget-install script which will get all the dependencies:
find-script *winget*
install-script winget-install
winget-install
PowerShell Module Install
The following requires Powershell 7 which installs in-parallel or side-by-side (it does not replace Powershell 5). There is a winget module to install winget on Windows 10/11:
winget search replace-with-lazy-search-keywords-here (ie winget search shell) (means "shell" will show "Shell Notebook" "open shell" but also "TortoiseGit" because it is tagged with "shell")
winget install -h foo-app
winget upgrade -h foo-app
Winget Settings
winget settings This will open the settings file. It is a JSON file for customizations. Mine looks like this.
Winget From Out of Box
So if the Windows 10/11 system were from fresh install, it would look something like this:
And if you wanted to update all the software: winget upgrade --all --include-unknown or winget upgrade -r -u winget upgrade -r -u -h --accept-source-agreements --accept-package-agreements
Microsoft 365 profile pictures will source photos from a few places:
1-Teams The admin might have turned off the ability to easily edit the photo directly in MS Teams: https://teams.office.com
2-delve/contact-info In addition, the admin might have turned off the ability to view, access or change contact information in Delve: https://delve.office.com
3-outlook Further, the admin might not assign email accounts @domain.tld. As a result, we cannot login to email to access anything: https://outlook.office.com
4-sharepoint The following might work if MS Teams photo cannot be changed, Outlook365 is not being used and Delve is not available. If it allows the change, give 72 hours before it fully syncs the photo: https://domain-my.sharepoint.com/_layouts/15/editprofile.aspx
NOTES:
-sharepoint start is here: https://domain.sharepoint.com/_layouts/15/sharepoint.aspx
-sharepoint personal is here: https://domain-my.sharepoint.com (ie: https://domain-my.sharepoint.com/personal/firstname_lastname_domain_com/_layouts/15/onedrive.aspx)
-sharepoint GLOBAL is here: https://domain.sharepoint.com
-sharepoint blog site is here: https://domain-my.sharepoint.com/personal/firstname_lastname_domain_com/Blog/_layouts/15/people.aspx?MembershipGroupId=0&FilterField1=ContentType&FilterValue1=Person
-personal photo: https://domain.sharepoint.com/_layouts/15/userphoto.aspx?size=S&accountname=This email address is being protected from spambots. You need JavaScript enabled to view it. https://domain.sharepoint.com/_layouts/15/userphoto.aspx?size=L&username=This email address is being protected from spambots. You need JavaScript enabled to view it.
Process: -download MSI from above. -extract files by running the download. -in the extracted files, use the XML to install office365-enterprise (e3,e5) or Volume-License (office365-business is separate) -customize xml for the environment.
Customize XML Customizing the XML can be cumbersome. There are many resources on the web but here are a few to make life easier:
Download the install files: The call to setup.exe can be local in the directory or can be from a share/UNC path (ie \\server\share).
If local, the path is not needed: setup.exe /download myConfiguration-v1.xml
If share, the path is required: \\server\share\setup.exe /download \\server\share\myConfiguration-v1.xml (not: \\server\share\setup.exe /download myConfiguration-v1.xml)
Install Office365 | Install Microsoft365: This is used to install, configure, remove, update O365:
If local, the path is not needed: setup.exe /configure myConfiguration-v1.xml
If share, the path is required: \\server\share\setup.exe /configure \\server\share\myConfiguration-v1.xml (not: \\server\share\setup.exe /configure myConfiguration-v1.xml)
The script for installation will be: REBOOT UNINSTALL REBOOT INSTALL REBOOT