VMWARE Clone VM OS Hard Disk (Exclude Additional Hard Disks)
Let's say you have a VM that is storing data in which the OS is on a hard disk and each year of data is on a separate hard disk. It would look like this:
- C: OS
- D: 2017
- E: 2018
- F: 2019
- G: 2020
- H: 2021
- I: 2022
- L: 2023
- M: 2024
Now, let's say that you want to clone the OS system because it has specially configured software but you don't want to clone the data.
- -in VCENTER
- -right-click > CLONE-TO-VIRTUAL-MACHINE
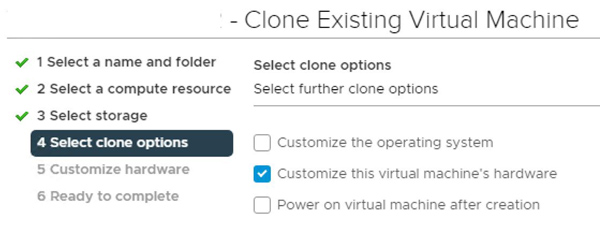
- -select a NAME, COMPUTE-RESOURCE and STORAGE.
- -select CUSTOMIZE THIS VIRTUAL MACHINE'S HARDWARE.
- -click the X to remove the ADDITIONAL HARD DISK.
- -uncheck DELETE FILES FROM DATASTORE.
- -uncheck the NETWORK ADAPTER (so that you can change the IP address before connecting to the network).
When the clone is done, only the OS drive cloned.


VM CLONE BUG
When using the CUSTOMIZE THIS VIRTUAL MACHINE'S HARDWARE option, the newly created VM still references the original VMDK. This is a bug.
Note that the VMDK is cloned correctly, it just isn't selected in the configuration.
To resolve, change the configuration to select the newly created VMDK:
- click ACTIONS > EDIT SETTINGS
- click the X to remove the HARD DISK (do not delete from datastore).
- click ADD NEW DEVICE > EXISTING HARD DISK.
- select the NEW-VM-FOLDER-NAME.
- select the NEW-VMDK file.
When you boot the VM, it may complain but it sorts itself out after a few minutes. Just:
- change the IP address.
- change the systemname.
- reboot.
- upon reboot, connect to the network.
Manual Clone
You can also make a new directory, copy some of the VM source files to the new directory, change the file names and some of the settings in the config file to make a clone.
- -create new directory with the new VM name (ie NEW-VM-NAME-HERE).
- -shutdown the source VM.
- -copy the following to the new directory:
- VMX file.
- VMXF file.
- VMDK file for each hard disk.
Note that if there is a snap shot, it needs the - nvram file.
- hlog file.
- -rename the newly created files to match the NEW-VM-NAME-HERE.
- -for the VMDK files do not modify anything after the "_". So OLD-VM-NAME-HERE_4.vmdk to NEW-VM-NAME-HERE_4.vmdk)
- -download the VMX file to your local system..
- -edit the VMX file with a text editor.
- -edit the following to reference NEW-VM-NAME-HERE.
- DISPLAYNAME
- VMDK (rename the reference to each hard disk to NEW-VM-NAME-HERE.VMDK (ie scsi0:0.fileName = "NEW-VM-NAME-HERE_4.vmdk"))
- VNRAM
- HLOG
- VSWP
- -save the file.
- -upload to the new directory.
- -checkmark the VMX file.
- -click REGISTER VM.
Edit the VM SETTINGS.
- -click ACTIONS > EDIT SETTINGS
- -click the X to remove any additional HARD DISK not needed (do not delete from datastore).
When you boot the VM, it will ask is you COPIED or MOVED:
- -select COPIED if the system needs a new MAC ADDRESS.
- -select MOVED if the system needs the existing MAC ADDRESS.
- -the boot should complete.
- -change the IP address.
- -change the systemname.
- -reboot.
- -upon reboot, connect to the network.
NOTES:
https://www.nakivo.com/blog/vmware-esxi-clone-vm/
https://knowledge.broadcom.com/external/article/342208/renaming-a-virtual-machine-and-its-files.html